Istio DestinationRule 流量管控
DestinationRule 是 VirtualService 路由生效后,配置应用于请求的策略集
dr 的作用:
- 定义子集
- 流量控制
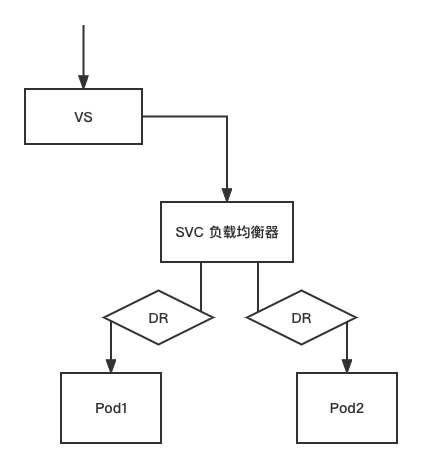
DR的基本用法-定义子集
mkdir chap3 && cd chap3
cp chap2/vs.yaml chap2/mygw1.yaml chap3/
#清除之前环境的svc,再新建一个 svc 来负载 pod1 pod2
kubectl delete svc svc2
kubectl delete svc svc1
#给 pod1 pod2 设置同样的标签
kubectl label pod pod1 name=pod
kubectl label pod pod2 name=pod
kubectl get pods -l name=pod
#查看标签
kubectl get pods --show-label
#具有共同的标签 name=pod,不同的标签:run=pod1 ; run=pod2
# 虽然写的是pod1,但是还是根据selecter的标签
kubectl expose --name=svc1 pod pod1 --port=80 --selector=name=pod
#查看 svc1 关联的pod
kubectl describe svc svc1 #在Endpoints上可以看到已经关联了 pod1 pod2
# 编辑 vs yaml
vim vs.yaml
apiVersion: networking.istio.io/v1alpha3
kind: VirtualService
metadata:
name: myvs
spec:
hosts:
- "aa.yuan.cc"
gateways:
- mygw
http:
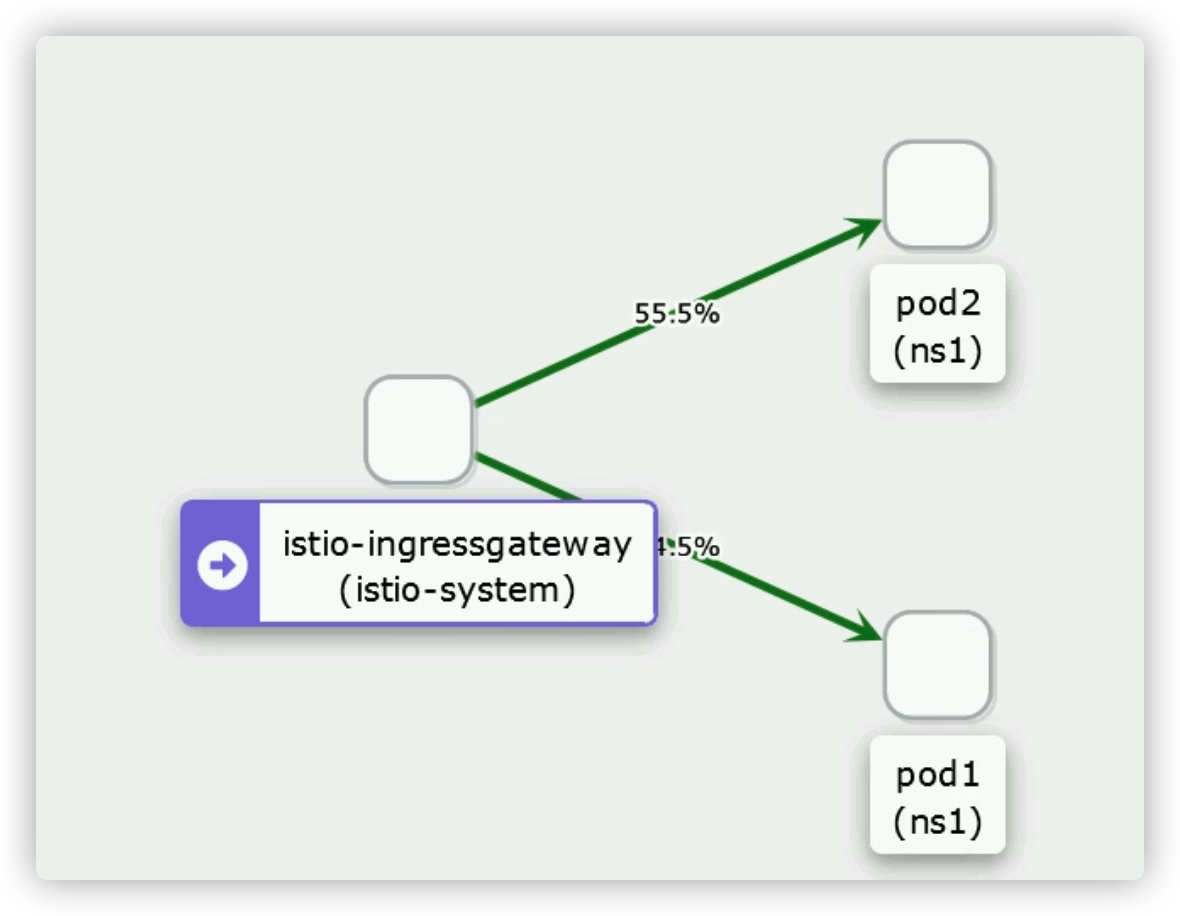
- route:
- destination:
host: svc1
subset: xx #subset是自定的标识
weight: 55
- destination:
host: svc1
subset: yy
weight: 45
# 启动 vs
kubectl apply -f vs.yaml
# 定义dr,编辑 dr yaml
vim dr.yaml
apiVersion: networking.istio.io/v1alpha3
kind: DestinationRule
metadata:
name: mydr
spec:
host: svc1 #管理的是 svc1 的流量
subsets:
- name: xx #自定义,跟 vs 的 subset 做匹配
labels: #根据标签做匹配
#version: v1
run: pod1
- name: yy #自定义
labels:
#version: v2
run: pod2
# 启动 dr
kubectl apply -f dr.yaml
kubectl get dr
# 客户端测试
while true ; do curl aa.yuan.cc ; sleep 1 ; done
查看 kiali 权重图
蓝绿部署
# 定义dr,编辑 dr yaml
vim dr.yaml

apiVersion: networking.istio.io/v1alpha3
kind: DestinationRule
metadata:
  name: mydr
spec:
  host: svc1  #管理的是 svc1 的流量
  subsets:
  - name: v1 #自定义,跟 vs 的 subset 做匹配
    labels:  #根据标签做匹配
      #version: v1
      run: pod1
  - name: v2  #自定义
    labels:
      #version: v2
      run: pod2

# 编辑 vs yaml
vim vs.yaml

apiVersion: networking.istio.io/v1alpha3
kind: VirtualService
metadata:
  name: myvs
spec:
  hosts:
  - "aa.yuan.cc"
  gateways:
  - mygw
  http:
  - route:
    - destination:
        host: svc1
        subset: v1  #subset是自定的标识
      weight: 100
    - destination:
        host: svc1
        subset: v2
      weight: 0   # 在权重上做蓝绿部署,100 : 0

# 启动 vs,dr
kubectl apply -f dr.yaml
kubectl apply -f vs.yaml

# 查看 kiali 流量分布
金丝雀发布(灰度发布)
# 编辑 vs yaml
vim vs.yaml

apiVersion: networking.istio.io/v1alpha3
kind: VirtualService
metadata:
  name: myvs
spec:
  hosts:
  - "aa.yuan.cc"
  gateways:
  - mygw
  http:
  - route:
    - destination:
        host: svc1
        subset: v1
      weight: 100
    - destination:
        host: svc1
        subset: v2
      weight: 0

# 流量的变化
1、v2 并没有对任何人开放
2、v2 对极少一部分人开放  #将权重从 100:0 切为 90:10
3、v2 给更多的人开放     #权重继续更改...
会话保持
会话保持的目的是,让同一个客户端访问的时候,访问到同一个pod上,istio用一致性哈希算法实现
了会话保持。
在trafficPolicy.loadBalancer.consistentHash里的字段包括:
httpHeaderName: 根据HTTP Header获取哈希值
httpCookie: 根据HTTP Cookie获取哈希值 (根据 Cookie 来做会话保持)
userSourceIp: 根据源IP获取哈希值 (根据 IP 地址来做的会话保持)
minimumRingSize: 哈希环所需的最小虚拟节点数量,默认值为1024
使用httpCookie时的字段:
name: cookie的名称
path: 设置cookie的路径
ttl:cookie的生命期
while true ; do curl aa.rhce.cc --cookie "user=tester" --silent -w "Status: %{http_code}\n"; sleep 1 ; done
基于 cookie 的会话保持
# 备份一下 vs yaml,恢复最初的 vs
mv vs.yaml vs-subset.yaml
cp ../chap2/vs.yaml .

# 编辑 vs yaml
vim vs.yaml

apiVersion: networking.istio.io/v1alpha3
kind: VirtualService
metadata:
  name: myvs
spec:
  hosts:
  - "aa.yuan.cc"
  gateways:
  - mygw
  http:
  - route:
    - destination:
        host: svc1

# 启动 vs
kubectl apply -f vs.yaml

# 修改 dr yaml,添加 trafficPolicy: httpCookie:
vim dr.yaml

apiVersion: networking.istio.io/v1alpha3
kind: DestinationRule
metadata:
  name: mydr
spec:
  host: svc1
  trafficPolicy:
     loadBalancer:
       consistentHash:
         httpCookie:
           name: user
           ttl: 60s
  subsets:
  - name: v1
    labels:
      run: pod1
  - name: v2
    labels:
      run: pod2

# 启动 dr
kubectl apply -f dr.yaml

# 客户端测试,需要带着 cookie 做测试
while true ; do curl  --cookie "user=tester"  aa.rhce.cc ; sleep 1 ; done
# 返回结果一直是 pod1的111 或者是 pod2的222,不会切换,如果 cookie 的 value 不是 user,则会话不保持:
while true ; do curl  --cookie "user11=tester"  aa.rhce.cc ; sleep 1 ; done  #这是不保持的
基于 ip 地址的会话保持
# 修改 dr yaml,添加 trafficPolicy:
vim dr.yaml

apiVersion: networking.istio.io/v1alpha3
kind: DestinationRule
metadata:
  name: mydr
spec:
  host: svc1
  trafficPolicy:
     loadBalancer:
       consistentHash:
         useSourceIp: true  #根据 IP 地址来做的会话保持
         #httpCookie:
         #  name: user
         #  ttl: 60s
  subsets:
  - name: v1
    labels:
      run: pod1
  - name: v2
    labels:
      run: pod2

# 启动 dr
kubectl apply -f dr.yaml

# 客户端测试
while true ; do curl  aa.rhce.cc ; sleep 1 ; done  # IP不变,返回结果是固定的

# 清理环境
cp dr.yaml dr-session.yaml
kubectl delete -f dr.yaml
DR调度算法-RANDOM-ROUND_ROBIN
# 编写 dr-arithmetic yaml
cp dr.yaml dr-arithmetic.yaml
vim dr-arithmetic.yaml

apiVersion: networking.istio.io/v1alpha3
kind: DestinationRule
metadata:
  name: mydr
spec:
  host: svc1
  trafficPolicy:
     loadBalancer:
       simple: RANDOM  #随机策略
       #simple: ROUND_ROBIN  #轮询策略

-------------------------------------------------
# 针对于多个 svc ,但只需对某个 svc 做策略
apiVersion: networking.istio.io/v1alpha3
kind: DestinationRule
metadata:
  name: mydr
spec:
  host: svc1
  subsets:
  - name: v1
    labels:
      run: pod1
  - name: v2
    labels:
      run: pod2
    trafficPolicy:
       loadBalancer:
         simple: RANDOM  #随机策略
         #simple: ROUND_ROBIN  #轮询策略
DR调度算法-LEAST_CONN
kubectl get pod -o wide # 查看pod在哪个节点

# 编写 dr-arithmetic yaml
vim dr-arithmetic.yaml

apiVersion: networking.istio.io/v1alpha3
kind: DestinationRule
metadata:
  name: mydr
spec:
  host: svc1
  trafficPolicy:
     loadBalancer:
       simple: LEAST_CONN  #当进行轮训的时候,先检测哪个pod负载较轻, 就把流量转发到哪个pod上去。

# 重启 dr arithmetic
kubectl apply -f dr-arithmetic.yaml

#在对应节点安装 webbench 压测工具
yum install ctags* gcc -y
mkdir -p -m 644 /usr/local/man/man1

wget wget http://www.ha97.com/code/webbench-1.5.tar.gz
tar zxvf webbench-1.5.tar.gz ; cd webbench-1.5

make && make install

# 查看 pod ip
kubectl get pods -owide

# 压测 pod2
webbench -c 500 -t 300 http://10.244.223.203/

# 查看 kiali
# 清理环境
kubectl delete -f dr-arithmetic.yaml
熔断
熔断的定义是在DR里定义的,主要�有2部分
第一部分:
trafficPolicy:
用于定义连接池
连接池的定义分成两类:
- TCP 连接
- maxConncections: 到目标主机的最大连接数
- connectTimeOut: TCP连接超时,最小值必须要大于1ms
- Http 连接
- http1MaxPendingReguests: 针对一个目标的HTTP请求最大排队数量,默认是1024
- http2MaxRequests: 对一个后端的最大请求数
- maxRequestsPerConnection:
- maxReties: 在给定的时间,集群所有主机最大重试数,默认值为3
第二部分:
outlierDetection:
用于定义熔断的条件,达到什么条件就开始熔断
consecutiveErrors: 超过这错误数量之后,主机会被移除连接池。默认是5,当上游服务是
http服务时,5xx返回代码会记录为错误。当上游主机提供的是TCP服务时,TCP连接超时和连接错
误被标记为错误。
interval: 在移除检测之间的时间间隔,默认是10s,必须要>=1ms
baseEjectionTime: 最小的移除时间长度。主机每次被移除后的间隔时间等于被移除的次数和
最小移除时间的乘积。这样的实现,让系统能够自动增加不健康上游服务实例的间隔时间,默认时
间为30s。
maxEjectionPercent: 上游服务的负载均衡池中允许被移除的主机的最大百分比,默认是10%。
# 编辑 dr rongduan
vim dr-rongduan.yaml

apiVersion: networking.istio.io/v1alpha3
kind: DestinationRule
metadata:
  name: mydr
spec:
  host: svc1
  trafficPolicy:
    connectionPool:
      http:
        http1MaxPendingRequests: 1  #针对一个目标的HTTP请求最大排队数量,最大为1(根据业务而设置)
        maxRequestsPerConnection: 1
    outlierDetection:
      consecutiveGatewayErrors: 1
      interval: 10s
      baseEjectionTime: 3m
      maxEjectionPercent: 100
  #subsets:
  #- name: v2
  #  labels:
  #    run: pod2

# 启动 dr-rongduan
kubectl apply -f dr-rongduan.yaml

# 下载 fortio 测试
rpm -i https://github.com/fortio/fortio/releases/download/v1.30.0/fortio-1.30.0-1.x86_64.rpm

# fortio测试
fortio load -c 5 -n 20 -qps 0 http://aa.yuan.cc
# 命令解释如下: -c 表示并发数 -n 一共多少请求 -qps 每秒查询数,0 表示不限制
# 可以看到 Code 200:(25.0 %) ; Code 503:(75.0 %)

# 如果对 dr-rongduan.yaml 进行修改 http1MaxPendingRequests: 5,那么再次执行 fortio 并发为 5,则 Code 状态码都为 200