ceph 高可用集群
ceph 搭建
基础环境配置
1. 配置网络
1
2
| 我这里 ceph01、ceph02、ceph03 对应的地址分别为:
192.168.75.128 192.168.75.129 192.168.75.130
|
2. 关闭防火墙
所有机器均关闭掉防火墙。
1
2
3
4
5
| systemctl disable iptables
systemctl stop iptables
systemctl disable firewalld
systemctl stop firewalld
selinux 也要关闭
|
3. 配置加速源
所有机器均配置 yum 国内加速源:
1
2
3
4
5
6
| yum install -y wget
mv /etc/yum.repos.d/CentOS-Base.repo /etc/yum.repos.d/CentOS-Base.repo.backup
wget -O /etc/yum.repos.d/CentOS-Base.repo http://mirrors.aliyun.com/repo/Centos-7.repo
wget -O /etc/yum.repos.d/epel.repo http://mirrors.aliyun.com/repo/epel-7.repo
yum clean all
yum makecache
|
所有机器均配置 pip 国内加速源:
1
2
3
4
5
6
| mkdir ~/.pip
cat > ~/.pip/pip.conf << EOF
[global]
trusted-host=mirrors.aliyun.com
index-url=https://mirrors.aliyun.com/pypi/simple/
EOF
|
4. 配置主机名解析
1
2
3
4
5
6
7
| 这里配置的是部署节点到其它机器间的主机解析。
在所有节点上执行:
vim /etc/hosts 添加如下内容: # 具体的 ip 看 vpn 给分配的 ip 来填写
10.128.0.14 ceph1
10.128.0.10 ceph2
10.128.0.18 ceph3
|
5. 配置机器间的免密登录
1
2
3
4
5
6
7
8
9
10
11
12
13
14
15
| 这里配置的是部署节点到其它机器间的免密登录。
在 ceph01 (部署节点)节点上执行:
1. 生成公私钥:
ssh-keygen
2. 拷贝公钥到其它机器上:
注意:以下每行命令执行后都需要输入密码,不能直接全部复制粘贴。
ssh-copy-id -i /root/.ssh/id_rsa.pub root@ceph1
ssh-copy-id -i /root/.ssh/id_rsa.pub root@ceph2
ssh-copy-id -i /root/.ssh/id_rsa.pub root@ceph3
3. 测试免密登录
命令参考如下,尽量每个节点都测试一下
ssh root@ceph3
|
6. 安装 ntp 服务
1
2
3
| 所有机器执行如下命令:
yum install -y ntp ntpdate ntp-doc
|
7. 配置主机名
注意!当前步骤十分重要。
1
2
3
4
5
6
7
8
| 在 ceph 中读取了 hostname 命令产生的结果。
因此在每个节点上均需修改自己的 hostname。命令参考:
进入到 ceph01 节点上:
hostname ceph1
echo "ceph1" > /etc/hostname
按照此方法修改其它节点的 hostname。
|
开始部署 ceph
主要分两步:
第一步,安装 ceph-deploy
第二步,使用 ceph-deploy 安装 ceph 组件。
第一步:在 node01(部署节点)上安装 ceph-deploy
1
2
3
4
5
| 安装 ceph-deploy: # 此步骤只在192.168.75.128上执行
yum install -y python-pip
pip install -U pip
pip install ceph-deploy==2.0.1
|
第二步:在 node01(部署节点)上使用 ceph-deploy 部署 ceph 组件
1. 更换 ceph-deploy 将使用的 ceph 源(决定安装什么版本的 ceph):
1
2
3
4
| 该步骤所有命令均在部署节点上执行。
export CEPH_DEPLOY_REPO_URL=http://mirrors.aliyun.com/ceph/rpm-nautilus/el7
export CEPH_DEPLOY_GPG_URL=http://mirrors.aliyun.com/ceph/keys/release.asc
|
接下来的步骤只在192.168.75.128上执行
2. 创建部署临时目录:
1
2
| mkdir /opt/ceph-deploy
cd /opt/ceph-deploy
|
3. 部署一个新集群,生成初始配置(参数 ceph01 是指该集群的第一个节点):
1
| ceph-deploy new ceph1 ceph2 ceph3 (需要加哪个加点就填上哪个节点)
|
4. 在该目录下生成了新集群的一些配置文件。接下来需要对这些配置文件做一些改动:
1
2
3
4
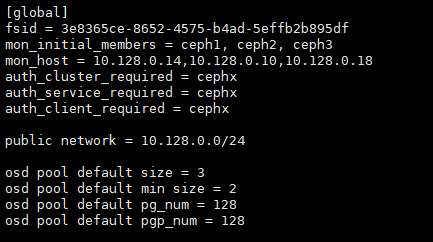
| vim /opt/ceph-deploy/ceph.conf
在 [global] 中增加:
public network = 10.128.0.0/24
|
5. 安装 ceph:
1
2
3
| ceph-deploy install ceph1 ceph2 ceph3
## /usr/bin/yum -y install ceph ceph-radosgw #上步安装失败的话执行这个,先在各个节点安装好!(要有ceph.repo这个源,才能安装)然后执行下一步(前提是/etc/hosts配置好)
|
6. 初始化 ceph monitor:
1
2
3
| ceph-deploy mon create-initial
当前命令执行以后,可以在当前目录下发现许多的 keyring 文件,这是连接其它节点的凭据。以后的 ceph-deploy 命令均在当前目录下执行才可正常使用。
|
7. 同步配置文件
1
2
3
| 将当前临时文件夹下的配置文件同步到所有节点的 /etc/ceph/ 下
ceph-deploy admin ceph1 ceph2 ceph3
|
8. 安装 ceph mgr
1
| ceph-deploy mgr create ceph1 ceph2 ceph3
|
9. 安装 ceph mds
1
| ceph-deploy mds create ceph1
|
这个要根据自己的环境找到正确的硬盘。
1
2
3
4
5
6
7
8
9
10
11
12
| # 这一条在自己的虚拟机上加硬盘需要分区再格式化
命令参考如下:
ceph-deploy osd create --data /dev/sdb ceph1
ceph-deploy osd create --data /dev/sdc ceph1
ceph-deploy osd create --data /dev/sdd ceph1
ceph-deploy osd create --data /dev/sdb ceph2
ceph-deploy osd create --data /dev/sdc ceph2
ceph-deploy osd create --data /dev/sdd ceph2
ceph-deploy osd create --data /dev/sdb ceph3
ceph-deploy osd create --data /dev/sdc ceph3
ceph-deploy osd create --data /dev/sdd ceph3
|
其中/dev/sdb ceph1,表示 ceph1 节点上的 /dev/sdb 硬盘。
1
2
3
4
| 命令执行完以后,基础的环境就算搭建完成了。可以执行如下命令查看集群的状态:
ceph 健康: ceph health
ceph 集群详细状态:ceph -s
ceph 集群 osd 状态:ceph osd tree
|
至此,该集群还处于一个基础的状态,并不能正常使用
接下来需要配置 ceph pool 相关信息,以及安装配置 rgw 从而使用对象存储功能。
10. 配置 ceph pool
1
2
3
4
5
6
7
| vim /opt/ceph-deploy/ceph.conf
在 global 中增加如下:
osd pool default size = 3
osd pool default min size = 2
osd pool default pg_num = 128
osd pool default pgp_num = 128
|
其中 pg num 需要计算得出,pgp num 与 pg num 保持一致。
1
2
| 粗略的计算方法:
( osd 数量 * 100 ) / 池副本数。
|
同步配置文件:
1
| ceph-deploy --overwrite-conf admin ceph1 ceph2 ceph3
|
12. 安装配置 rgw
1
2
3
4
5
| vim /opt/ceph-deploy/ceph.conf
增加如下内容:
[client]
rgw frontends = civetweb port=17480
|
整体配置如下:
安装 rgw:
1
| ceph-deploy --overwrite-conf rgw create ceph1 ceph2 ceph3
|
测试集群
1
2
3
4
5
6
| 新的ceph集群搭建后需要创建一个radosgw的最高权限账号:
1、创建多租户的用户
radosgw-admin user create --uid="yuanshisen" --display-name="yuanshisen" --tenant yuanshisen --access_key QAOF1YNP105E9PXC4WH4 --secret I3g1L0hOStzXpcfE4EGW1UtohdSaUm6ga6Q9OX23
2、添加所有权限
radosgw-admin --id admin caps add --caps="buckets=*;users=*;usage=*;metadata=*" --uid=yuanshisen --tenant=yuanshisen
|
YSSAWSTest.java
1
2
3
4
5
6
7
8
9
10
11
12
13
14
15
16
17
18
19
20
21
22
23
24
25
26
27
28
29
30
31
32
33
34
35
36
37
38
39
40
41
42
43
44
45
46
47
48
49
50
51
52
| import com.amazonaws.ClientConfiguration;
import com.amazonaws.Protocol;
import com.amazonaws.auth.AWSCredentials;
import com.amazonaws.auth.AWSStaticCredentialsProvider;
import com.amazonaws.auth.BasicAWSCredentials;
import com.amazonaws.client.builder.AwsClientBuilder;
import com.amazonaws.services.s3.AmazonS3;
import com.amazonaws.services.s3.AmazonS3Client;
import com.amazonaws.services.s3.AmazonS3ClientBuilder;
import com.amazonaws.services.s3.model.Bucket;
import java.util.List;
/**
* @author : yuanshisen
* @date : 2020/1/5
*/
public class YSSAWSTest {
protected static String accessKey = "QAOF1YNP105E9PXC4WH4";
protected static String secretKey = "I3g1L0hOStzXpcfE4EGW1UtohdSaUm6ga6Q9OX23";
protected static String endpoint = "http://192.168.75.81:17480";
public static void main(String[] args) {
// 创建连接对象
AWSCredentials credentials = new BasicAWSCredentials(accessKey, secretKey);
AmazonS3ClientBuilder builder = AmazonS3ClientBuilder.standard().withCredentials(new AWSStaticCredentialsProvider(credentials));
AwsClientBuilder.EndpointConfiguration endpointConfiguration = new AwsClientBuilder.EndpointConfiguration(endpoint,null);
builder.setEndpointConfiguration(endpointConfiguration);
AmazonS3 conn = builder.build();
// 创建连接对象
// AWSCredentials credentials = new BasicAWSCredentials(accessKey, secretKey);
// ClientConfiguration clientConfig = new ClientConfiguration();
// clientConfig.setProtocol(Protocol.HTTP);
// AmazonS3 conn = new AmazonS3Client(credentials,clientConfig);
// conn.setEndpoint(endpoint);
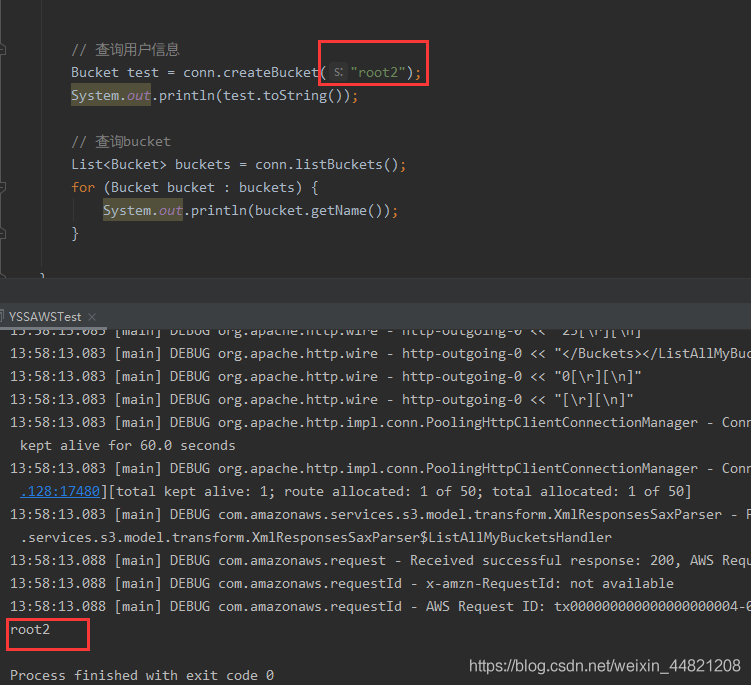
// 查询用户信息
Bucket test = conn.createBucket("root2");
System.out.println(test.toString());
// 查询bucket
List<Bucket> buckets = conn.listBuckets();
for (Bucket bucket : buckets) {
System.out.println(bucket.getName());
}
}
}
|
YSSRadosgwAdminTest.java
1
2
3
4
5
6
7
8
9
10
11
12
13
14
15
16
17
18
19
20
21
22
23
24
25
26
27
28
29
30
31
32
33
34
35
36
37
38
39
40
41
| import org.twonote.rgwadmin4j.RgwAdmin;
import org.twonote.rgwadmin4j.RgwAdminBuilder;
/**
* Amazon S3 SDK方法测试
*
* @author : yuanshisen
* @date : 2020/1/12
*/
public class YSSRadosgwAdminTest {
protected static String accessKey = "QAOF1YNP105E9PXC4WH4";
protected static String secretKey = "I3g1L0hOStzXpcfE4EGW1UtohdSaUm6ga6Q9OX23";
protected static String endpoint = "http://192.168.75.81:17480/admin";
public static void main(String[] args) {
try {
RgwAdmin rgwAdmin = new RgwAdminBuilder().accessKey(accessKey).secretKey(secretKey).endpoint(endpoint).build();
System.out.println(rgwAdmin.createUser("root"));
System.out.println(rgwAdmin.listUser());
// rgwAdmin.createUser(username);
// System.out.println(rgwAdmin.listUser());
// rgwAdmin.removeUser(username);
// System.out.println(rgwAdmin.listUser());
// 判断用户是否存在
// Optional<User> userInfo = rgwAdmin.getUserInfo("202");
// if (userInfo.isPresent()){
// System.out.println("该用户存在。。。");
// } else {
// System.out.println("该用户不存在。。。");
// }
} catch (Exception e) {
e.printStackTrace();
}
}
}
|
pom.xml
1
2
3
4
5
6
7
8
9
10
11
12
13
14
15
16
17
18
19
20
21
22
23
24
25
26
27
28
29
30
31
32
33
34
35
36
37
38
39
40
41
42
43
44
45
46
47
48
49
50
51
52
53
54
55
56
57
58
59
60
61
62
63
64
65
66
67
68
69
70
71
72
73
74
75
76
77
| <?xml version="1.0" encoding="UTF-8"?>
<project xmlns="http://maven.apache.org/POM/4.0.0"
xmlns:xsi="http://www.w3.org/2001/XMLSchema-instance"
xsi:schemaLocation="http://maven.apache.org/POM/4.0.0 http://maven.apache.org/xsd/maven-4.0.0.xsd">
<modelVersion>4.0.0</modelVersion>
<groupId>org.example</groupId>
<artifactId>ceph-test</artifactId>
<version>1.0-SNAPSHOT</version>
<dependencies>
<dependency>
<groupId>com.amazonaws</groupId>
<artifactId>aws-java-sdk</artifactId>
<version>1.11.787</version>
</dependency>
<!--radosgw-admin4j-->
<dependency>
<groupId>com.squareup.okhttp3</groupId>
<artifactId>okhttp</artifactId>
<version>3.6.0</version>
</dependency>
<dependency>
<groupId>com.google.code.gson</groupId>
<artifactId>gson</artifactId>
<version>2.8.0</version>
</dependency>
<dependency>
<groupId>com.google.guava</groupId>
<artifactId>guava</artifactId>
<version>21.0</version>
</dependency>
<dependency>
<groupId>junit</groupId>
<artifactId>junit</artifactId>
<version>4.12</version>
<!-- <scope>test</scope>-->
</dependency>
<dependency>
<groupId>com.amazonaws</groupId>
<artifactId>aws-java-sdk-s3</artifactId>
<version>1.11.91</version>
<!-- <scope>test</scope>-->
</dependency>
<dependency>
<groupId>javax.xml.bind</groupId>
<artifactId>jaxb-api</artifactId>
<version>2.3.0</version>
<!-- <scope>test</scope>-->
</dependency>
<dependency>
<groupId>org.javaswift</groupId>
<artifactId>joss</artifactId>
<version>0.9.13</version>
<!-- <scope>test</scope>-->
</dependency>
<dependency>
<groupId>org.apache.httpcomponents</groupId>
<artifactId>httpclient</artifactId>
<version>4.5.2</version>
<!-- <scope>test</scope>-->
</dependency>
<!-- Print S3 SDK debug log -->
<dependency>
<groupId>ch.qos.logback</groupId>
<artifactId>logback-classic</artifactId>
<version>1.2.1</version>
<!-- <scope>test</scope>-->
</dependency>
<dependency>
<groupId>io.github.twonote</groupId>
<artifactId>radosgw-admin4j</artifactId>
<version>2.0.2</version>
</dependency>
</dependencies>
</project>
|
RUN一下,查看输出结果。输出成功 , 如下图所示: