跳到主要内容

Linux 修行之路 · Blog

Linux修行之路 - 技术博客

分享Kubernetes、Linux、Python、网络安全等技术文章

文章数量169
技术分类9
查看分类
11

KubeEdge v1.3 部署安装

· 阅读需 4 分钟

KubeEdge v1.3 部署安装

前提: 安装好了 K8s 集群,K8s 版本为1.16.2

并修改 /etc/kubernetes/manifests/kube-apiserver.yaml

    - --insecure-port=8080
- --insecure-bind-address=0.0.0.0

使用二进制安装

云端操作:

设置 KubeEdge 主节点

  • 创建CRD
kubectl apply -f https://raw.githubusercontent.com/kubeedge/kubeedge/master/build/crds/devices/devices_v1alpha2_device.yaml

kubectl apply -f https://raw.githubusercontent.com/kubeedge/kubeedge/master/build/crds/devices/devices_v1alpha2_devicemodel.yaml

kubectl apply -f https://raw.githubusercontent.com/kubeedge/kubeedge/master/build/crds/reliablesyncs/cluster_objectsync_v1alpha1.yaml

kubectl apply -f https://raw.githubusercontent.com/kubeedge/kubeedge/master/build/crds/reliablesyncs/objectsync_v1alpha1.yaml

如果下载不下来,可以访问下面这个github下载:https://github.com/kubeedge/kubeedge/tree/master/build/crds/devices

  • 准备配置文件
## 下载二进制包:
wget https://github.com/kubeedge/kubeedge/releases/download/v1.3.0/kubeedge-v1.3.0-linux-amd64.tar.gz

## 准备配置文件
tar xf kubeedge-v1.3.0-linux-amd64.tar.gz
cd kubeedge-v1.3.0-linux-amd64/cloud/cloudcore

## 创建配置文件
使用命令创建最小配置 ./cloudcore --minconfig > /etc/kubeedge/config/cloudcore.yaml

或带有命令的完整配置 ./cloudcore --defaultconfig > /etc/kubeedge/config/cloudcore.yaml

  • RUN
./cloudcore --config /etc/kubeedge/config/cloudcore.yaml
  • 检查

cloudcore

边缘端操作:

  • 安装 Docker
## 设置 yum 源
curl -o /etc/yum.repos.d/docker-ce.repo http://mirrors.aliyun.com/docker-ce/linux/centos/docker-ce.repo

yum clean all && yum makecache

## 安装 Docker
yum install -y docker-ce-cli-19.03.9-3.el7 docker-ce-19.03.9-3.el7

## 启动 Docker
systemctl enable docker && systemctl start docker
  • 把云端的 edgecore copy 过来一份
scp -r 192.168.8.102:/opt/kubeedge-v1.3.0-linux-amd64/ /opt/
cd /opt/kubeedge-v1.3.0-linux-amd64/edge
  • 生成配置文件
edgecore --minconfig > /root/edgecore.yaml
  • 去云端服务器生成 token
kubectl get secret -nkubeedge tokensecret -o=jsonpath='{.data.tokendata}' | base64 -d
  • 配置文件详解 ( 避免踩坑 )
vim /root/edgecore.yaml

apiVersion: edgecore.config.kubeedge.io/v1alpha1
database:
dataSource: /var/lib/kubeedge/edgecore.db
kind: EdgeCore
modules:
edgeHub:
heartbeat: 15
httpServer: https://192.168.8.101:10002 #默认云端IP和端口
tlsCaFile: /etc/kubeedge/ca/rootCA.crt
tlsCertFile: /etc/kubeedge/certs/server.crt
tlsPrivateKeyFile: /etc/kubeedge/certs/server.key
token: "e97268645d7bb5122d5d5e38fc3149a312f0a6cfcb7fa6e4281183f1b717762b.eyJhbGciOiJIUzI1NiIsInR5cCI6IkpXVCJ9.eyJleHAiOjE2MzQzNDk4Njh9._lYCVGLTxmgGtzmjdRP6rZyCBiP3qbJA5F9bbkTfcYs" #从云端拿下来的token
websocket:
enable: true
handshakeTimeout: 30
readDeadline: 15
server: 192.168.8.101:10000 #默认云端IP和端口
writeDeadline: 15
edged:
cgroupDriver: cgroupfs
cgroupRoot: ""
cgroupsPerQOS: true
clusterDNS: ""
clusterDomain: ""
devicePluginEnabled: false
dockerAddress: unix:///var/run/docker.sock
gpuPluginEnabled: false
hostnameOverride: edge-node #边缘节点的hostname
interfaceName: ens33 #边缘节点的网卡名
nodeIP: 192.168.8.240 #边缘节点的IP
podSandboxImage: kubeedge/pause:3.1
remoteImageEndpoint: unix:///var/run/dockershim.sock
remoteRuntimeEndpoint: unix:///var/run/dockershim.sock
runtimeType: docker
eventBus:
mqttMode: 2
#KubeEdge 支持 3 种 MQTT 模式(internalMqttMode、bothMqttMode、externalMqttMode),将mqttModeedgecore.yaml 中的字段设置为所需的模式。+ internalMqttMode:启用内部 mqtt 代理(mqttMode=0)。+ bothMqttMode:启用内部和外部代理(mqttMode=1)。+ externalMqttMode:仅启用外部代理(mqttMode=2)。
#要在双 mqtt 或外部模式下使用 KubeEdge,您需要确保在边缘节点上安装 mosquitto 或 emqx edge 作为 MQTT Broker。
mqttQOS: 0
mqttRetain: false
mqttServerExternal: tcp://127.0.0.1:1883
mqttServerInternal: tcp://127.0.0.1:1884
  • edge 端的 Mosquitto 安装
## 添加EPEL软件库
yum install -y https://dl.fedoraproject.org/pub/epel/epel-release-latest-7.noarch.rpm

## 下载mosquitto
yum install -y mosquitto
  • 启动 Mosquitto
mosquitto -d -p 1883
  • RUN
edgecore --config /root/edgecore.yaml
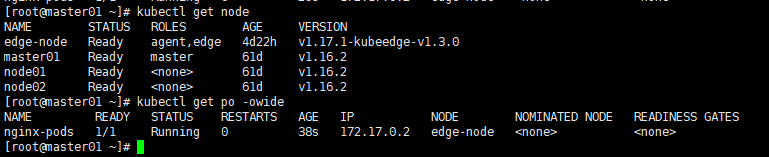
  • 验证节点

验证

  • 验证是否能部署服务

vim nginx_v1.yaml

apiVersion: v1
kind: Pod
metadata:
name: nginx-pods
namespace: default
labels:
app: nginx
release: v1
spec:
containers:
- name: nginx-pods
image: nginx:latest
imagePullPolicy: IfNotPresent
ports:
- containerPort: 80
---
apiVersion: v1
kind: Service
metadata:
name: nginx-service-nodeport
spec:
ports:
- port: 80
targetPort: 80
protocol: TCP
type: NodePort
selector:
app: nginx

kubectl create -f nginx_v1.yaml #创建服务

查看节点是否部署到了 Edge-node 上:

验证pod

Mysql 安装

· 阅读需 4 分钟

Mysql 安装

1.1 创建目录

[root@db01 ~]# mkdir -p /data/app/ /data/3306/data /data/3306/binlog

1.2 创建MySQL相关用户、组

[root@db01 ~]# useradd mysql [root@db01 ~]# chown -R mysql.mysql /data

1.3 系统残留清空

[root@db01 ~]# yum remove mariadb-libs -y

社区版下载地址

https://downloads.mysql.com/archives/community/

2 软件上传和解压

cd /data/app [root@db01 app]# tar xf mysql-5.7.28-linux-glibc2.12-x86_64.tar.gz [root@db01 app]# ln -s mysql-5.7.28-linux-glibc2.12-x86_64 mysql [root@db01 app]# chown -R mysql. /data

3 环境变量设置

vim /etc/profile #添加一行: export PATH=/data/app/mysql/bin:$PATH

#生效配置

source /etc/profile

检查设置

[root@db01 bin]# mysql -V

4 准备基础配置文件

cat >/etc/my.cnf <<EOF [mysqld] user=mysql basedir=/data/app/mysql datadir=/data/3306/data server_id=6 socket=/tmp/mysql.sock [client] socket=/tmp/mysql.sock EOF

5 初始化数据

5.7 + 版本 :

[root@db01 bin]# mysqld --initialize-insecure --user=mysql --basedir=/data/app/mysql --datadir=/data/3306/data

#########报错############### mysqld: error while loading shared libraries: libaio.so.1: cannot open shared object file: No such file or directory [root@db01 bin]# ########################

报错处理:

[root@db01 bin]# yum install -y libaio-devel

再次运行初始化命令

[root@db01 bin]# mysqld --initialize-insecure --user=mysql --basedir=/data/app/mysql --datadir=/data/3306/data

2020-03-13T03:33:34.530498Z 0 [Warning] TIMESTAMP with implicit DEFAULT value is deprecated. Please use --explicit_defaults_for_timestamp server option (see documentation for more details). 2020-03-13T03:33:34.923532Z 0 [Warning] InnoDB: New log files created, LSN=45790 2020-03-13T03:33:35.000129Z 0 [Warning] InnoDB: Creating foreign key constraint system tables. 2020-03-13T03:33:35.061644Z 0 [Warning] No existing UUID has been found, so we assume that this is the first time that this server has been started. Generating a new UUID: 6b64f882-64db-11ea-88a1-000c29248f69. 2020-03-13T03:33:35.065248Z 0 [Warning] Gtid table is not ready to be used. Table 'mysql.gtid_executed' cannot be opened. 2020-03-13T03:33:36.340554Z 0 [Warning] CA certificate ca.pem is self signed. 2020-03-13T03:33:36.603604Z 1 [Warning] root@localhost is created with an empty password ! Please consider switching off the --initialize-insecure option.

+++++++++++++++++报错++++++++++++++++++++++

[root@db01 bin]# mysqld --initialize-insecure --user=mysql --basedir=/data/app/mysql --datadir=/data/3306/data

2020-03-13T03:35:50.039977Z 0 [Warning] TIMESTAMP with implicit DEFAULT value is deprecated. Please use --explicit_defaults_for_timestamp server option (see documentation for more details). 2020-03-13T03:35:50.043386Z 0 [ERROR] --initialize specified but the data directory has files in it. Aborting. 2020-03-13T03:35:50.043441Z 0 [ERROR] Aborting

[root@db01 bin]#

处理方法: 清空datadir目录下所有数据,重新初始化。 !!!!!!生产需要详细确认。!!!!!!!!!! +++++++++++++++++++++++++++++++++++++++++

6 准备启动脚本

[root@db01 ~]# cp /data/app/mysql/support-files/mysql.server /etc/init.d/mysqld

方法一: 自带脚本(适合于单机单MySQL)

启动方式 1: SYS-V (C6服务管理方式) [root@db01 ~]# service mysqld start /stop /restart [root@db01 ~]# service mysqld start Starting MySQL.Logging to '/data/3306/data/db01.err'. SUCCESS! [root@db01 ~]# service mysqld stop Shutting down MySQL.. SUCCESS! [root@db01 ~]# service mysqld restart ERROR! MySQL server PID file could not be found! Starting MySQL. SUCCESS! [root@db01 ~]# /etc/init.d/mysqld restart Shutting down MySQL.. SUCCESS! Starting MySQL. SUCCESS!

启动方式2: C7 管理方式 systemd
[root@db01 ~]# chkconfig --add mysqld
[root@db01 ~]# systemctl stop mysqld
[root@db01 ~]# systemctl start mysqld
[root@db01 ~]# systemctl restart mysqld

# 自启动
systemctl enable mysqld
[root@db01 ~]# mysqladmin -uroot -p password qA6C9RHn

#直接回车

[root@db01 ~]# mysql -u root -p qA6C9RHn

mysql> show master status; +-------------------+----------+--------------+------------------+-------------------+ | File | Position | Binlog_Do_DB | Binlog_Ignore_DB | Executed_Gtid_Set | +-------------------+----------+--------------+------------------+-------------------+ | master-bin.000001 | 2556 | | | | +-------------------+----------+--------------+------------------+-------------------+

如搭建主从:

CHANGE MASTER TO MASTER_HOST='192.168.100.171', MASTER_USER='repl', MASTER_PASSWORD='passwd123', MASTER_PORT=3306, MASTER_LOG_FILE='master-bin.000001', MASTER_LOG_POS=2556, MASTER_CONNECT_RETRY=10;

开启远程登陆

方法一: 选择 mysql 数据库

use mysql;

在 mysql 数据库的 user 表中查看当前 root 用户的相关信息

select host, user, authentication_string, plugin from user; 
show variables like '%skip_networking%';

授权 root 用户的所有权限并设置远程访问

CREATE USER 'root'@'%' IDENTIFIED BY 'root';

ALTER USER 'root'@'%' IDENTIFIED WITH mysql_native_password BY 'root';

设置为远程登录

GRANT ALL PRIVILEGES ON *.* TO 'root'@'%' IDENTIFIED BY 'root' WITH GRANT OPTION;

刷新权限

flush privileges;

如若有root存在localhost权限则需删掉

drop user root@localhost; 

方法二:

mysql8.0 不能使用方法一,需使用方法二

use mysql;

update user set host='%' where user='root';

Nacos 高可用搭建

· 阅读需 2 分钟

Nacos 高可用搭建

下载 nacos 二进制文件

tar xf nacos-server-1.1.0.tar.gz

编辑集群配置文件

在nacos的解压目录nacos/的conf目录下,有配置文件cluster.conf,请每行配置成ip:port。(请配置3个或3个以上节点)

#ip:port
192.168.8.201:8848
192.168.8.202:8848
192.168.8.203:8848

使用数据库存放数据

在 conf 目录下有 nacos-mysql.sql 的 sql 文件;在数据库中创建对应的数据库,并执行此 sql 文件

编辑 application.properties 文件,追加对应配置信息

db.num=1
db.url.0=jdbc:mysql://192.168.8.222:3306/nacos_config?characterEncoding=utf8&connectTimeout=1000&socketTimeout=3000&autoReconnect=true
db.user=root
db.password=xxxxxxxx

启动服务器

单节点启动

./startup.sh -m standalone

集群模式

使用内置数据源

sh startup.sh -p embedded

使用外置数据源

sh startup.sh

配置Nginx

upstream nacos {
server 192.168.8.201:8848;
server 192.168.8.202:8848;
server 192.168.8.203:8848;
}
server {
listen 8848;
server_name 192.168.8.217;

location / {
proxy_pass http://nacos;
}

error_page 500 502 503 504 /50x.html;
location = /50x.html {
root /usr/share/nginx/html;
}
}

nginx -s reload #热加载配置