istio virtualservice 流量管控
架构示意图
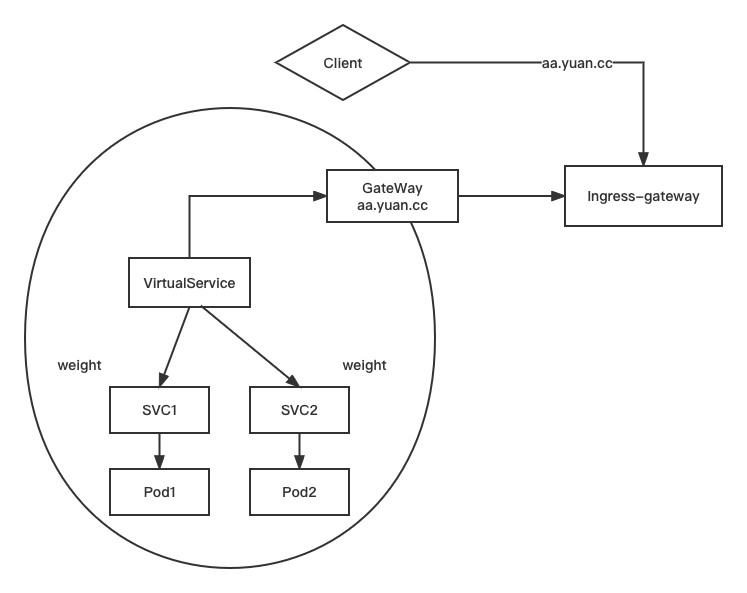
创建网关
Gateway 为HTTP/TCP 流量配置负载均衡器,最常见的是在网格边缘的操作,以启用应用程序的入口流量
创建 gateway
1
2
3
4
5
6
7
8
9
10
11
12
13
14
15
16
17
18
19
20
21
22
23
24
25
26
27
28
29
30
31
32
33
34
35
36
37
38
39
40
41
| mkdir chap2
cd chap2
cp ../chap1/pod1.yaml ./
kubectl exec -it pod1 -- sh -c "echo 111 > /usr/share/nginx/html/index.html"
kubectl get pods -o wide
curl -s 10.244.223.200
kubectl expose --name=svc1 pod pod1 --port=80
kubectl get svc -n istio-system
kubectl get gw
vim mygw1.yaml
apiVersion: networking.istio.io/v1alpha3
kind: Gateway
metadata:
name: mygw
spec:
selector:
istio: ingressgateway
servers:
- port:
number: 80
name: http-1
protocol: HTTP
hosts:
- "aa.yuan.cc"
kubectl get pods -n istio-system -l istio=ingressgateway
kubectl apply -f mygw1.yaml
kubectl get gw
|
virtualService 的基本使用
创建 vs1
1
2
3
4
5
6
7
8
9
10
11
12
13
14
15
16
17
18
19
20
21
22
23
| kubectl get vs
vim vs1.yaml
apiVersion: networking.istio.io/v1alpha3
kind: VirtualService
metadata:
name: myvs
spec:
hosts:
- "aa.yuan.cc"
gateways:
- mygw
http:
- route:
- destination:
host: svc1
kubectl apply -f vs1.yaml
kubectl get vs
|
测试流量是否跑通
1
2
3
4
5
6
7
8
9
10
11
12
13
14
15
16
17
18
19
20
21
22
23
24
25
26
27
28
29
30
31
32
33
34
35
36
37
38
39
40
41
42
| # 找一个服务器客户端
vim /etc/hosts
#写入口网关规定的ip地址
192.168.15.230 aa.yuan.cc aa
192.168.15.230 bb.yuan.cc bb
curl aa.rhce.cc
# 111
curl -I bb.rhce.cc
# bb 是访问不了的,404 ; 因为在网关中没有定义 bb
# 在gateway 中添加 bb 的配置
vim mygw1.yaml
- port:
number: 80
name: http-2
protocol: HTTP
hosts:
- "bb.yuan.cc"
# 重新启动
kubectl apply -f mygw1.yaml
# 此时再次访问 bb.yuan.cc 可以访问通嘛? 还是不行的,因为 vs 没有定义,要不你需要在原本 vs 中加上 bb 的 hosts,要不你就需要再添加一个 vs 来指明 bb
curl -I bb.rhce.cc
# 编写 vs1 yaml
vim vs1.yaml
spec:
hosts:
- "aa.yuan.cc"
- "bb.yuan.cc"
# 重新启动
kubectl apply -f vs1.yaml
curl -I bb.rhce.cc
-------------------------------------------------------
上述是为了测试,如果遇到这种需求可以使用通配符,在gateway yaml中将hosts改为:”*.yuan.cc“
|
带有权重的 virtualService
创建 svc2
1
2
3
4
5
6
7
8
9
10
11
| # 创建 pod2
sed 's/pod1/pod2/' pod1.yaml | kubectl apply -f -
kubectl get pods
# 更改 pod2 web 页面
kubectl exec -it pod2 -- sh -c "echo 222 > /usr/share/nginx/html/index.html"
# 创建 svc2
kubectl expose --name=svc2 pod pod2 --port=80
kubectl get svc
curl <CLUSTER IP> # 222
|
修改 vs1
1
2
3
4
5
6
7
8
9
10
11
12
13
14
15
16
17
18
19
20
21
22
23
24
|
vim vs1.yaml
apiVersion: networking.istio.io/v1alpha3
kind: VirtualService
metadata:
name: myvs
spec:
hosts:
- "aa.yuan.cc"
gateways:
- mygw
http:
- route:
- destination:
host: svc1
weight: 65
- route:
- destination:
host: svc2
weight: 35
kubectl apply -f vs1.yaml
|
测试 vs 权重
1
2
3
4
5
6
| # 在客户端服务器中访问请求
while true ; do
> curl aa.yuan.cc ; sleep 1
> done
# 去 kiali 上添加上 istio-system 的 namespace ,在 Show Edge Labels 中勾选 请求分布
|
查看 kiali 权重图
故障注入
fault : delay 测试svc1的延迟
1
2
3
4
5
6
7
8
9
10
11
12
13
14
15
16
17
18
19
20
21
22
23
24
25
26
| vim vs1.yaml
apiVersion: networking.istio.io/v1alpha3
kind: VirtualService
metadata:
name: myvs
spec:
hosts:
- "aa.yuan.cc"
gateways:
- mygw
http:
- fault:
delay:
percent: 100
fixedDelay: 1s
route:
- destination:
host: svc1
kubectl apply -f vs1.yaml
curl aa.yuan.cc.
|
fault : abort 模拟中断
1
2
3
4
5
6
7
8
9
10
11
12
13
14
15
16
17
18
19
20
21
22
23
24
25
26
27
28
29
| vim vs1.yaml
apiVersion: networking.istio.io/v1alpha3
kind: VirtualService
metadata:
name: myvs
spec:
hosts:
- "aa.yuan.cc"
gateways:
- mygw
http:
- fault:
abort:
percentage:
value: 100
httpStatus: 503
route:
- destination:
host: svc1
kubectl apply -f vs1.yaml
curl -I aa.yuan.cc
|
超时
创建 pod 和 svc
1
2
3
4
5
6
7
8
9
10
11
12
13
14
15
16
17
18
19
20
21
22
23
24
25
26
27
28
29
30
| sed 's/pod1/pod3/' pod1.yaml | kubectl apply -f -
sed 's/pod1/pod4/' pod1.yaml | kubectl apply -f -
kubectl get pods
#把 pod4 nginx界面改为444
kubectl exec -it pod4 -- sh -c "echo 444 > /usr/share/nginx/html/index.html"
# 创建 svc
kubectl expose --name=svc3 pod pod3 --port=80
kubectl expose --name=svc4 pod pod4 --port=80
# 修改 pod3 中 nginx 配置文件
kubectl cp pod3:/etc/nginx/conf.d/default.conf default.conf
vim default.conf
location / {
#root /usr/share/nginx/html;
#index index.html index.htm
proxy_pass http://svc4;
proxy_http_version 1.1;
}
kubectl cp default.conf pod3:/etc/nginx/conf.d/default.conf
kubectl exec -it pod3 -- bash
nginx -t
nginx -s reload
# 测试结果
kubectl get svc
curl `svc3的IP` # 会显示 svc4 -> pod4 的444结果
|
创建 vs2
1
2
3
4
5
6
7
8
9
10
11
12
13
14
15
16
17
18
19
20
21
22
23
24
25
26
27
| kubectl get vs
kubectl delete -f vs1.yaml
vim vs2.yaml
apiVersion: networking.istio.io/v1alpha3
kind: VirtualService
metadata:
name: myvs1
spec:
hosts:
- "aa.yuan.cc"
gateways:
- mygw
http:
- route:
- destination:
host: svc3
timeout: 3s
kubectl apply -f vs2.yaml
curl aa.yuan.cc.
|
创建 vs3
1
2
3
4
5
6
7
8
9
10
11
12
13
14
15
16
17
18
19
20
21
22
23
24
25
26
27
28
29
30
31
32
33
34
| vim vs3.yaml
apiVersion: networking.istio.io/v1alpha3
kind: VirtualService
metadata:
name: myvs2
spec:
hosts:
- "svc4"
http:
- fault:
delay:
percent: 100
fixedDelay: 2s
route:
- destination:
host: svc4
kubectl apply -f vs3.yaml
curl aa.yuan.cc
vim vs3.yaml
fixedDelay: 5s
kubectl apply -f vs3.yaml
curl -I aa.yuan.cc
|
重试
1
2
3
4
5
6
7
8
9
10
11
12
13
14
15
16
17
18
19
20
21
22
23
24
25
26
27
28
29
30
31
32
33
34
35
36
37
38
39
40
41
42
43
44
45
46
47
48
49
50
51
52
53
54
55
56
57
58
59
60
61
62
|
vim vs2.yaml
apiVersion: networking.istio.io/v1alpha3
kind: VirtualService
metadata:
name: myvs1
spec:
hosts:
- "aa.yuan.cc"
gateways:
- mygw
http:
- route:
- destination:
host: svc3
timeout: 3s
retries:
attempts: 3
perTryTimeout: 3s
retryOn: 5xx
vim vs3.yaml
apiVersion: networking.istio.io/v1alpha3
kind: VirtualService
metadata:
name: myvs2
spec:
hosts:
- "svc4"
http:
- fault:
abort:
percentage:
value: 100
httpStatus: 503
route:
- destination:
host: svc4
kubectl apply -f vs2.yaml
kubectl apply -f vs3.yaml
kubectl logs -f pod3
curl aa.yuan.cc
kubectl delete pod pod3
kubectl delete pod pod4
kubectl delete svc svc3
kubectl delete svc svc4
kubectl delete -f vs2.yaml
kubectl delete -f vs3.yaml
|
http 重写
创建 vs , 还原一下环境
1
2
3
4
5
6
7
8
9
10
11
12
13
14
15
16
17
18
19
20
21
22
23
24
25
26
27
28
29
30
31
| kubectl get vs
kubectl get gw
kubectl get pod
kubectl get svc
cp vs1.yaml vs.yaml
vim vs.yaml
apiVersion: networking.istio.io/v1alpha3
kind: VirtualService
metadata:
name: myvs
spec:
hosts:
- "aa.yuan.cc"
gateways:
- mygw
http:
- route:
- destination:
host: svc1
kubectl apply -f vs.yaml
|
修改 vs
1
2
3
4
5
6
7
8
9
10
11
12
13
14
15
16
17
18
19
20
21
22
23
24
25
26
27
28
29
30
31
32
33
34
35
36
37
38
39
40
41
42
43
44
45
46
47
48
49
50
51
52
53
|
kubectl exec -it pod1 -- bash
cd /usr/share/nginx/html
mkdir demo1 demo2
echo aaa > demo1/index.html
echo bbb > demo2/index.html
curl aa.yuan.cc/demo1/index.html
curl aa.yuan.cc/demo2/index.html
cp vs.yaml vs-rewrite.yaml
vim vs-rewrite.yaml
apiVersion: networking.istio.io/v1alpha3
kind: VirtualService
metadata:
name: myvs
spec:
hosts:
- "aa.yuan.cc"
gateways:
- mygw
http:
- match:
- uri:
prefix: /demo1/
rewrite:
uri: /demo2/
route:
- destination:
host: svc1
kubectl apply -f vs-rewrite.yaml
curl aa.yuan.cc/demo1/index.html
curl aa.yuan.cc/demo2/index.html
http:
- route:
- destination:
host: svc1
- match:
- uri:
prefix: /demo1/
rewrite:
uri: /demo2/
|
基于内容转发
1
2
3
4
5
6
7
8
9
10
11
12
13
14
15
16
17
18
19
20
21
22
23
24
25
26
27
28
29
30
31
32
33
34
| cp vs.yaml vs-content.yaml
vim vs-content.yaml
apiVersion: networking.istio.io/v1alpha3
kind: VirtualService
metadata:
name: myvs
spec:
hosts:
- "aa.yuan.cc"
gateways:
- mygw
http:
- match:
- headers:
User-Agent:
regex: .*(Chrome/([\d.]+)).*
route:
- destination:
host: svc1
- route:
- destination:
host: svc2
curl --user-agent "Mozilla/5.0 (Windows NT 6.1; WOW64) AppleWebKit/537.36 (KHTMLme/31.0.1650.63 Safari/537.36" -I aa.yuan.cc
curl --user-agent 'Chrome/54.0 (Windows NT 10.0)' aa.yuan.cc
|
影子测试(流量镜像)
1
2
3
4
5
6
7
8
9
10
11
12
13
14
15
16
17
18
19
20
21
22
23
24
25
26
27
| cp vs.yaml vs-mirror.yaml
vim vs-mirror.yaml
apiVersion: networking.istio.io/v1alpha3
kind: VirtualService
metadata:
name: myvs
spec:
hosts:
- "aa.yuan.cc"
gateways:
- mygw
http:
- route:
- destination:
host: svc1
mirror:
host: svc2
kubectl apply -f vs-mirror.yaml
curl --user-agent 'Chrome/54.0 (Windows NT 10.0)' aa.yuan.cc
kubectl logs -f pod2
|