Istio 安全管理
主要涉及
制作环境
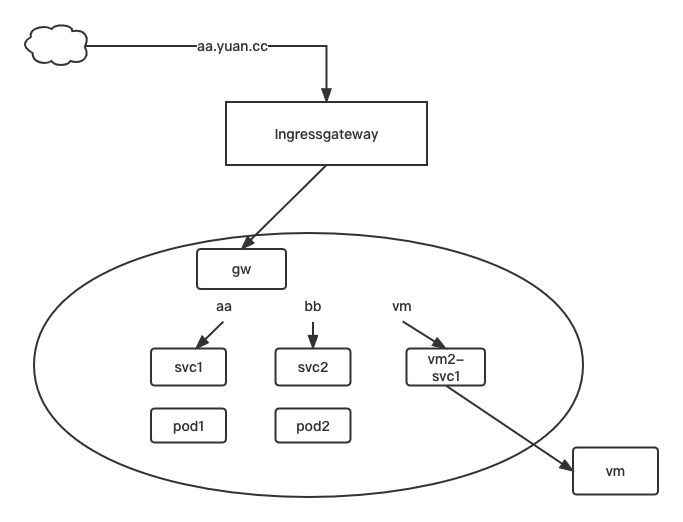
1 2 3 4 5 6 7 8 9 10 11 12 13 14 15 16 17 18 19 20 21 22 23 24 25 26 27 28 29 30 31 32 33 34 35 36 37 38 39 40 41 42 43 44 45 46 47 48 49 50 51 52 53 54 55 56 57 58 59 60 61 62 63 64 65 66 67 68 69 70 71 72 73 74 75 76 77 78 79 kubectl get svc kubectl delete svc svc1 kubectl expose --name=svc1 pod pod1 --port=80 kubectl expose --name=svc2 pod pod2 --port=80 mkdir chap5 && cd chap5 cp ../chap4/mygw1.yaml ../chap4/vs.yaml ../chap4/vs2.yaml ./ cat mygw1.yaml apiVersion: networking.istio.io/v1alpha3 kind: Gateway metadata: name: mygw spec: selector: istio: ingressgateway servers: - port: number: 80 name: http-1 protocol: HTTP hosts: - "*.yuan.cc" cat vs.yaml apiVersion: networking.istio.io/v1alpha3 kind: VirtualService metadata: name: myvs spec: hosts: - "aa.yuan.cc" gateways: - mygw http: - route: - destination: host: svc1 kubectl apply -f vs.yaml mv vs2.yaml vs3.yaml cat vs3.yaml apiVersion: networking.istio.io/v1alpha3 kind: VirtualService metadata: name: myvs3 spec: hosts: - "vm.yuan.cc" gateways: - mygw http: - route: - destination: host: vm2-svc kubectl apply -f vs3.yaml cp vs.yaml vs2.yaml cat vs2.yaml apiVersion: networking.istio.io/v1alpha3 kind: VirtualService metadata: name: myvs2 spec: hosts: - "bb.yuan.cc" gateways: - mygw http: - route: - destination: host: svc2 kubectl apply -f vs2.yaml
客户端服务器修改hosts
1
2
3
4
5
6
7
8
9
vim /etc/hosts 192.168.26.230 aa.yuan.cc aa 192.168.26.230 bb.yuan.cc bb 192.168.26.230 vm.yuan.cc vm # 测试连通 curl aa.yuan.cc #111 curl bb.yuan.cc #222 curl vm.yuan.cc #hello vm vm
为了安全性,我们更建议使用 https 访问
https —- http + TLS (传输层加密) 在 SSL 被放弃使用后转向 TLS
有效的提升安全性
有效提升网站权重(百度/谷歌)
有效解决流量劫持
启用 TLS 网关 对于istio 来说,所有需要的密钥都需要放入特定的目录中
1 2 3 4 5 6 7 8 9 10 11 12 13 14 15 16 17 18 19 20 21 22 23 24 25 26 27 28 29 30 31 32 33 34 35 36 37 38 39 40 41 42 43 44 45 46 47 48 49 50 51 52 53 54 55 56 57 58 59 60 61 62 63 64 65 66 67 68 69 70 71 72 73 74 75 76 77 78 79 80 81 82 83 84 85 86 87 88 89 90 91 92 93 94 95 96 97 98 99 100 101 102 103 104 105 106 107 108 109 110 111 112 113 114 115 116 117 118 119 120 121 122 mkdir -p /etc/istio/ingressgateway-certs/ openssl req -x509 -nodes -days 365 -newkey rsa:2048 -keyout /etc/istio/ingressgateway-certs/mykey.key -out /etc/istio/ingressgateway-certs/mycrt.crt -subj "/CN=mytest/O=my-test" kubectl create secret tls istio-ingressgateway-certs --key /etc/istio/ingressgateway-certs/mykey.key --cert /etc/istio/ingressgateway- certs/mycrt.crt -n istio-system cp mygw1.yaml mygw1-tls.yaml vim mygw1-tls.yaml apiVersion: networking.istio.io/v1alpha3 kind: Gateway metadata: name: mygw spec: selector: istio: ingressgateway servers: - port: number: 443 name: https protocol: HTTPS hosts: - "aa.yuan.cc" tls: mode: SIMPLE serverCertificate: /etc/istio/ingressgateway-certs/mycrt.crt privateKey: /etc/istio/ingressgateway-certs/mykey.key curl -kv https://aa.yuan.cc kubectl get pods -n istio-system kubectl logs istio-ingressgateway-8f747d485-g3h35 -n istio-system kubectl get depoly istio-ingressgateway -o yaml -n istio-system kubectl get secrets -n istio-system kubectl exec -it istio-ingressgateway-8f747d485-g3h35 -n istio-system -- bash ls /etc/istio/ingressgateway-certs vim mygw1-tls.yaml apiVersion: networking.istio.io/v1alpha3 kind: Gateway metadata: name: mygw spec: selector: istio: ingressgateway servers: - port: number: 443 name: https protocol: HTTPS hosts: - "aa.yuan.cc" tls: mode: SIMPLE serverCertificate: /etc/istio/ingressgateway-certs/tls.crt privateKey: /etc/istio/ingressgateway-certs/tls.key kubectl apply -f mygw1-tls.yaml curl -kv https://aa.yuan.cc -------------------------------------------- vim mygw1-tls.yaml apiVersion: networking.istio.io/v1alpha3 kind: Gateway metadata: name: mygw spec: selector: istio: ingressgateway servers: - port: number: 80 name: http-1 protocol: HTTP hosts: - "aa.yuan.cc" tls: httpsRedirect: true - port: number: 443 name: https protocol: HTTPS hosts: - "aa.yuan.cc" tls: mode: SIMPLE serverCertificate: /etc/istio/ingressgateway-certs/tls.crt privateKey: /etc/istio/ingressgateway-certs/tls.key
基于虚拟主机做 TLS 1 2 3 4 5 6 7 8 9 10 11 12 13 14 15 16 17 18 19 20 21 22 23 24 25 26 27 28 29 30 31 32 33 34 35 36 37 38 39 40 41 42 43 44 45 46 47 48 49 50 51 52 53 54 55 56 57 58 59 60 61 62 63 64 65 66 kubectl get secrets -n istio-system kubectl delete secrts istio-ingressgateway-certs -n istio-system ls /etc/istio/ingressgateway-certs openssl req -x509 -nodes -days 365 -newkey rsa:2048 -keyout /etc/istio/ingressgateway- certs/mykey22.key -out /etc/istio/ingressgateway-certs/mycrt22.crt -subj "/CN=mytest22/O=my-test22" kubectl create secret generic istio-ingressgateway-certs \ --from-file=/etc/istio/ingressgateway-certs/mycrt.crt \ --from-file=/etc/istio/ingressgateway-certs/mykey.key \ --from-file /etc/istio/ingressgateway-certs/mycrt22.crt \ --from-file /etc/istio/ingressgateway-certs/mykey22.key -n istio-system vim mygw1-tls.yaml apiVersion: networking.istio.io/v1alpha3 kind: Gateway metadata: name: mygw spec: selector: istio: ingressgateway servers: - port: number: 80 name: http-1 protocol: HTTP hosts: - "aa.yuan.cc" tls: httpsRedirect: true - port: number: 443 name: https-2 protocol: HTTPS hosts: - "aa.yuan.cc" tls: mode: SIMPLE serverCertificate: /etc/istio/ingressgateway-certs/mycrt.crt privateKey: /etc/istio/ingressgateway-certs/mykey.key - port: number: 443 name: https protocol: HTTPS hosts: - "bb.yuan.cc" tls: mode: SIMPLE serverCertificate: /etc/istio/ingressgateway-certs/mycrt22.crt privateKey: /etc/istio/ingressgateway-certs/mykey22.key kubectl apply -f mygw-tls.yaml curl -kv https://aa.yuan.cc curl -kv https://bb.yuan.cc kubectl get pods -n istio-system kubectl exec -it istio-ingressgateway-8f568d595-8cvl8 -n istio-system -- bash ls /etc/istio/ingressgateway-certs/
cert-manager 概念及使用
使用 cert-manager 来管理证书
通过 let encrypt 去帮助我们申请证书 (免费,但只有90天有效期,需要续期)
帮助文档:
https://letsencrypt.org/zh-cn/docs/
https://letsencrypt.org/zh-cn/how-it-works/
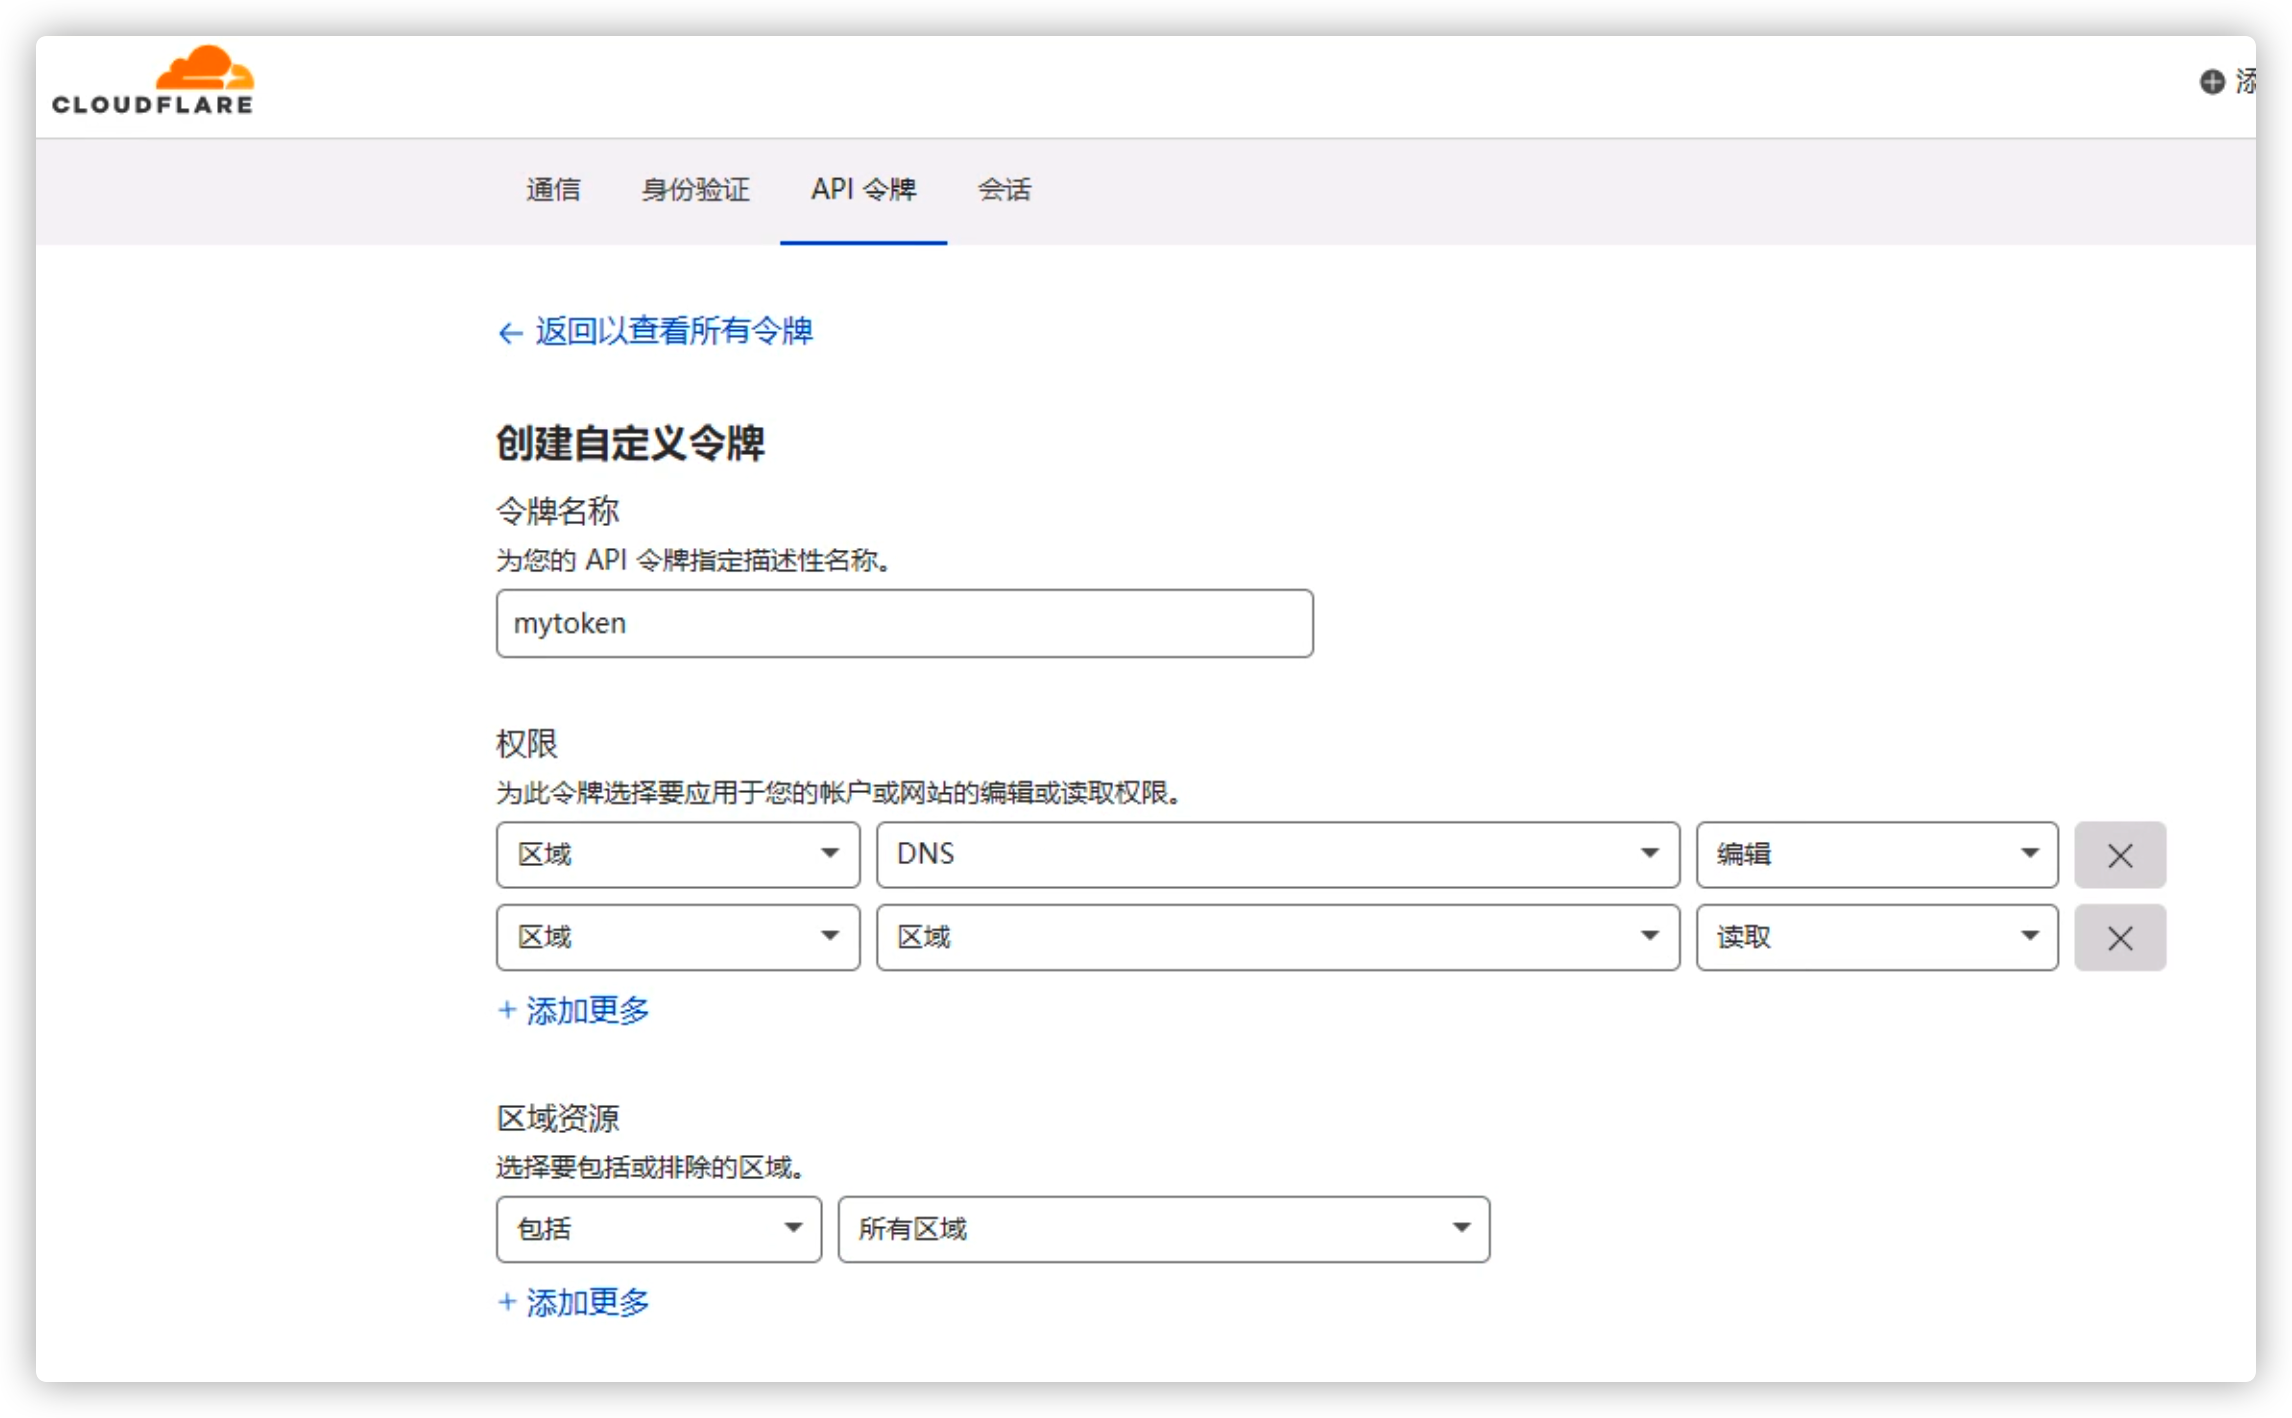
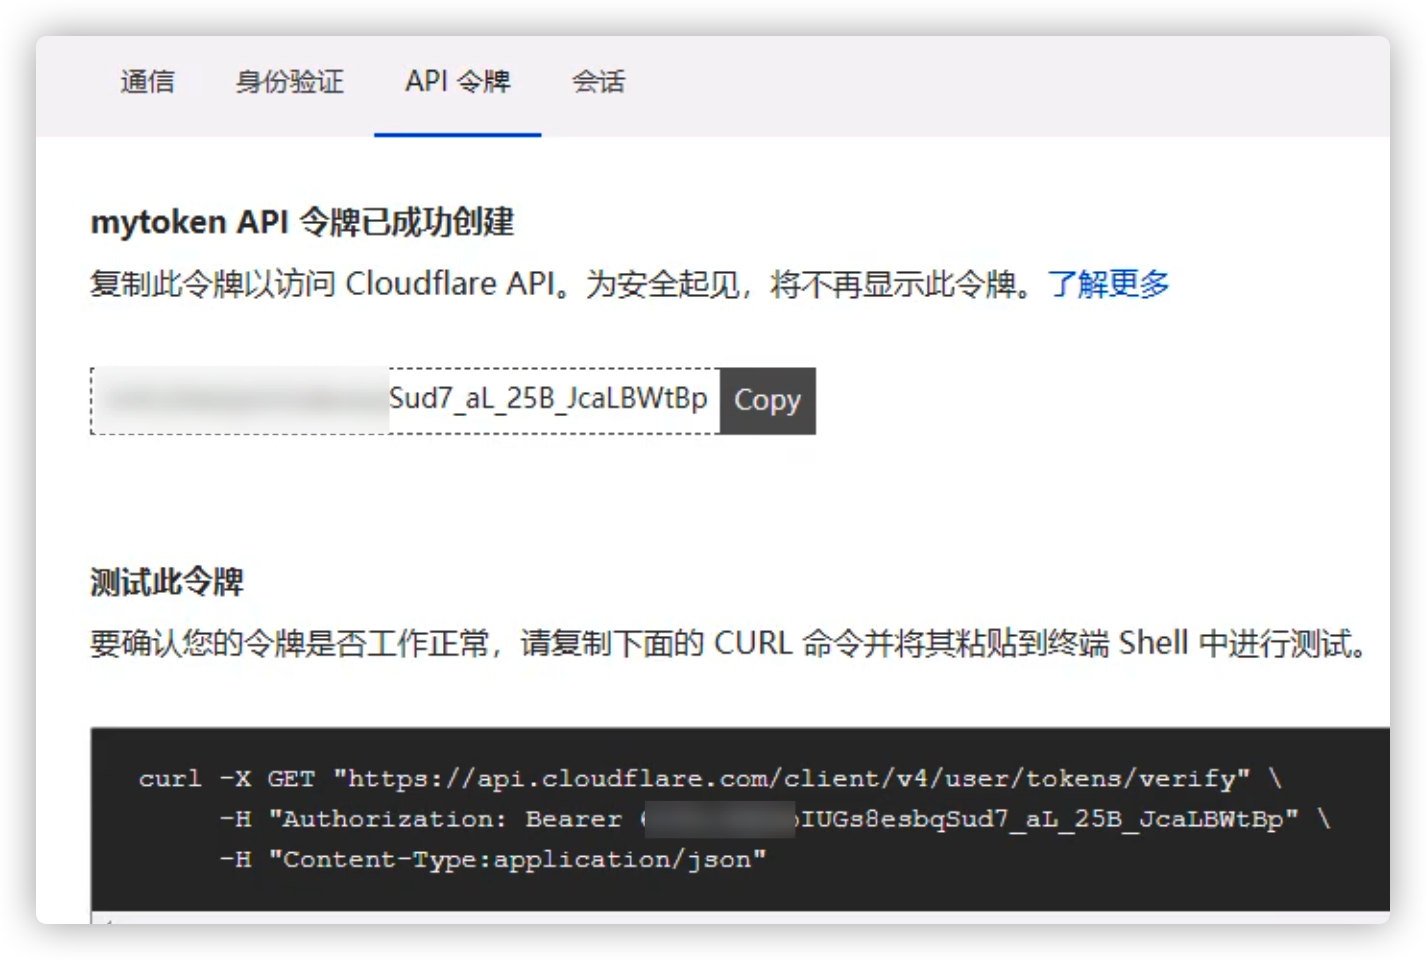
1 2 3 4 5 6 7 8 9 10 11 12 13 14 15 16 17 18 19 20 21 22 23 24 25 26 27 28 29 30 31 32 33 34 35 36 37 38 39 40 41 42 43 44 45 46 47 48 49 50 51 52 53 54 55 56 57 58 59 60 61 62 63 64 65 66 67 68 69 70 71 72 73 74 75 76 77 78 79 80 81 82 83 84 85 86 87 88 89 90 91 92 93 94 95 96 97 98 99 100 101 102 103 104 105 106 107 108 mkdir cert-m && cd cert-m wget https://github.com/cert-manager/cert-manager/releases/download/v0.16.0/cert-manager.yaml kubectl apply -f cert-manager.yaml kubectl get crd | grep cert cert-manager.io/docs/configuration/acme/dns01 https://dash.cloudflare.com/ 1 、添加站点 2 、选择 0 美元免费版 dash.cloudflare.com/profile/api-tokens 创建完令牌后会给出一段令牌,需要及时保存 vim mydnssecret.yaml apiVersion: v1 kind: Secret metadata: name: cloudflare-api-token-secret type: Opaque stringData: api-token: <API Token> kubectl get ns kubectl apply -f mydnssecret.yaml -n cert-manager kubectl get clusterissuer vim ciss.yaml apiVersion: cert-manager.io/v1alpha2 kind: ClusterIssuer metadata: name: letsencrypt-dns01 spec: acme: privateKeySecretRef: name: letsencrypt-dns01 server: https://acme-v02.api.letsencrypt.org/directory solvers: - dns01: cloudflare: email: my-cloudflare-acc@example.com apiTokenSecretRef: key: api-token name: cloudflare-api-token-secret kubectl apply -f ciss.yaml kubectl get clusterissuer kubectl get certificate kubectl get secrets www-ck8s-com-tls -o yaml kubectl get secrets www-ck8s-com-tls -o jsonpath='{.data.tls\.crt}' | base64 -d > mycertx.crt kubectl get secrets www-ck8s-com-tls -o jsonpath='{.data.tls\.key}' | base64 -d > mycertx.key cp mycertx.crt mycertx.key /etc/istio/ingressgateway-certs/ kubectl delete secrets istio-ingressgateway-certs -n istio-system kubectl create secret generic istio-ingressgateway-certs --from-file=/etc/istio/ingressgateway-certs/mycertx.crt --from-file=/etc/istio/ingressgateway-certs/mykeyx.key -n istio-system vim vs.yaml spec: hosts: - "www.ck8s.com" vim mygw1-tls.yaml servers: - port: number: 80 name: http-1 protocol: HTTP hosts: - "www.ck8s.com" tls: httpsRedirect: true - port: number: 443 name: https-2 protocol: HTTPS hosts: - "www.ck8s.com" tls: mode: SIMPLE serverCertificate: /etc/istio/ingressgateway-certs/mycertx.crt privateKey: /etc/istio/ingressgateway-certs/mykeyx.key kubectl apply -f vs.yaml kubectl apply -f mygw1-tls.yaml 浏览器访问 www.ck8s.com ,显示https 并且没有显示警告不安全
mTLS认证 PeerAuthentication
mTLS (mutual TLS,双向TLS): 让客户端和服务器端通信的时候都必须进行TLS认证
默认情况下,在网格内部 默认启用了mTLS 了。
PERMISSIVE:工作负载接受双向 TLS 和纯文本流量。
当没有 Sidecar 的工作负载无法使用双向 TLS 时,此模式适合用在迁移过程。
通过使用 sidecar 注入迁移工作负载后,应该将模式切换为 STRICT。
STRICT:工作负载仅接受双向 TLS 通信。
1 2 3 4 5 6 7 8 9 10 11 12 13 14 15 16 17 18 19 20 21 22 23 24 25 26 27 28 29 30 31 32 33 34 35 36 37 38 39 40 41 42 43 44 45 46 47 48 49 50 51 52 53 54 55 vim vs.yaml apiVersion: networking.istio.io/v1alpha3 kind: VirtualService metadata: name: myvs spec: hosts: - "aa.yuan.cc" - "svc1" gateways: - mygw http: - route: - destination: host: svc1 kubectl apply -f vs.yaml kubectl get pods -n default kubectl exec -it podx -n default -- bash curl svc1.ns1 111 -------------------------------------------------------- vim mtls1.yaml apiVersion: security.istio.io/v1beta1 kind: PeerAuthentication metadata: name: default spec: mtls: mode: STRICT kubectl get PeerAuthentication kubectl apply -f mtls1.yaml kubectl exec -it podx -n default -- bash curl svc1.ns1 kubectl delete pod podx -n default istioctl kube-inject -f podx.yaml | kubectl apply -f - -n default kubectl get pods -n default kubectl exec -it podx -n default -- bash curl svc1.ns1
单pod设置mTLS 1 2 3 4 5 6 7 8 9 10 11 12 13 14 15 16 17 18 19 20 21 22 23 24 25 26 27 28 29 30 31 32 33 34 35 36 37 38 39 40 41 42 43 44 45 46 47 48 49 50 51 52 53 54 55 56 57 kubectl delete pod podx -n default kubectl apply -f podx.yaml -n default kubectl exec -it podx -n default -- bash curl svc1.ns1 kubectl create ns ns2 kubectl get ns --show-labels kubectl label ns ns2 istio-injection=enabled kubectl apply -f podx.yaml -n ns2 kubectl get pods -n ns2 kubectl expose --name=svc2 pod podx --port=80 -n ns2 kubectl exec -it podx -n default -- bash curl svc2.ns2 kubectl delete pod podx -n ns2 kubectl delete svc svc2 -n ns2 ------------------------------------------------------------ vim mtls1.yaml apiVersion: security.istio.io/v1beta1 kind: PeerAuthentication metadata: name: default spec: selector: matchLabels: run: pod1 mtls: mode: STRICT vim mtls1.yaml apiVersion: security.istio.io/v1beta1 kind: PeerAuthentication metadata: name: default spec: selector: matchLabels: run: pod1 mtls: mode: STRICT portLevelMtls: 80: mode: DISABLE
授权管理AuthorizationPolicy
设置的是允许哪些客户端允许过来访问
拒绝优先级 > 允许优先级
基于命名空间做授权
1 2 3 4 5 6 7 8 9 10 11 12 13 14 15 16 17 18 19 20 21 22 23 24 25 26 27 28 29 30 31 32 33 34 35 36 37 38 39 40 41 42 43 44 45 46 47 48 49 50 51 52 53 54 55 56 57 58 59 60 61 62 kubectl delete -f mtls1.yaml kubectl delete svc vm2-svc kubectl delete -f ../chap4/mygw.yaml kubectl delete -f ../chap4/xx/ kubectl exec -it podx -n default -- bash curl aa.yuan.cc 111 curl bb.yuan.cc 222 kubectl get AuthorizationPolicy mkdir chap5/ap && cd chap5/ap vim rule-default-deny-all.yaml apiVersion: security.istio.io/v1beta1 kind: AuthorizationPolicy metadata: name: ns1-deny-all spec: {} kubectl apply -f rule-default-deny-all.yaml curl svc1.ns1 vim rule-allow-ns.yaml apiVersion: security.istio.io/v1beta1 kind: AuthorizationPolicy metadata: name: allow-ns namespace: ns1 spec: selector: matchLabels: run: pod1 action: ALLOW rules: - from: - source: namespaces: - "ns2" kubectl apply -f rule-allow-ns.yaml kubectl apply -f podx.yaml -n ns2 kubectl exec -it podx -n ns2 -- bash curl svc1
基于 IP 的限制 1 2 3 4 5 6 7 8 9 10 11 12 13 14 15 16 17 18 19 20 21 22 23 24 25 26 27 28 29 30 31 32 vim rule-allow-ns.yaml apiVersion: security.istio.io/v1beta1 kind: AuthorizationPolicy metadata: name: allow-ns namespace: ns1 spec: selector: matchLabels: run: pod1 action: ALLOW rules: - from: - source: ipBlocks: - "192.168.26.9/24" kubectl apply -f rule-allow-ns.yaml
when 的使用 1 2 3 4 5 6 7 8 9 10 11 12 13 14 15 16 17 - to: - operation: methods: ["GET" ] hosts: - svc1.ns1 paths: - /demo1/* - when: - key: request.headers[test] values: - "test" curl svc1.ns1 curl svc1.ns1 --header "test:test"
JWT 认证
JWT全称: Json Web Token
本质就是类似用户名和密码,客户端访问的时候,必须要提供这些token信息,不然访问不了。
这个token有固定的格式,采用JWK/JWKs格式的。
JWK: Json Web Key
JWKs :JWK set
生成TOKEN
https://jwt.io/
生成 token 1 2 3 4 5 6 7 8 9 10 11 12 13 14 15 16 17 18 yum install boost-python36.x86_64 python3-pip.noarch -y pip3 install ipython pip # 国内源 mkdir -p .pip vim .pip/pip.conf [global] index-url = http://pypi.douban.com/simple [install] trusted-host=pypi.douban.com pip3 install --upgrade pip pip3 install jwt pip3 install ipython jwcrypto mkdir token && cd token openssl genrsa -out key.pem 2048 openssl rsa -in key.pem -pubout -out pub.pem
写一个脚本– 用于实现生成 jwt token
1 2 3 4 5 6 7 8 9 10 11 12 13 14 15 16 17 18 19 vim aa.py from jwcrypto.jwk import JWK from pathlib import Pathprivate_key = Path("key.pem" ).read_bytes() jwk = JWK.from_pem(private_key) public_key = jwk.public().export_to_pem() print(public_key) print("=" *30 ) jwk_bytes = jwk.public().export() print(jwk_bytes)
python3 aa.py
显示生成kid
登入 https://jwt.io/,加密类型选择 RS256,添加自己的信息,得到 Encode
1 2 3 4 5 6 7 8 9 10 11 12 13 14 15 16 17 18 19 20 21 22 23 24 25 26 27 28 29 30 31 32 33 34 35 36 37 38 39 40 41 42 43 44 45 46 47 48 49 50 51 52 53 54 55 56 57 58 59 60 61 vim ra.yaml apiVersion: "security.istio.io/v1beta1" kind: "RequestAuthentication" metadata: name: "myra" spec: selector: matchLabels: run: pod1 jwtRules: - issuer: "testing@secure.istio.io" jwks: | { "keys": [ { "e" :"AQAB" , "kid" :"DHFbpoIUqrY8t2zpA2qXfCmr5VO5ZEr4RzHU_-envvQ" , "kty" :"RSA" , "n" :"xAE7eB6qugXyCAG3yhh7pkDkT65pHymX- P7KfIupjf59vsdo91bSP9C8H07pSAGQO1MV_xFj9VswgsCg4R6otmg5PV2He95lZdHtOcU5DXIg_pbhLdKXbi66GlVeK6ABZOUW3 WYtnNHD-91gVuoeJT_DwtGGcp4ignkgXfkiEm4sw-4sfb4qdt5oLbyVpmW6x9cfa7vs2WTfURiCrBoUqgBo_- 4WTiULmmHSGZHOjzwa8WtrtOQGsAFjIbno85jp6MnGGGZPYZbDAa_b3y5u- YpW7ypZrvD8BgtKVjgtQgZhLAGezMt0ua3DRrWnKqTZ0BJ_EyxOGuHJrLsn00fnMQ" } ] } kubectl apply -f ra.yaml { "alg": "RS256" , "kty": "RSA" , "use": "sig" , "kid": "xxx" , "n": "xxx" , "e": "AQAB" } kubectl apply -f default-deny-all.yaml vim allow-only2.yaml apiVersion: security.istio.io/v1beta1 kind: AuthorizationPolicy metadata: name: require-jwt spec: selector: matchLabels: run: pod1 action: ALLOW rules: - from: - source: requestPrincipals: ["testing@secure.istio.io/testing@secure.istio.io" ] kubectl apply -f allow-only2.yaml curl -I -H "Authorization: Bearer $TOKEN" svc1.ns1 curl -I -H "Authorization: Bearer invalidToken" svc1.ns1