Istio 多集群管理 多主架构安装 :
https://istio.io/v1.10/zh/docs/setup/install/multicluster/multi-primary/
第二个集群操作 1 2 3 4 5 6 7 8 9 10 11 12 13 14 15 16 17 18 19 20 21 22 23 24 25 26 27 28 29 30 31 32 33 34 35 36 kubeadm config view # podSubnet: 10.244.0.0/16 # serviceSubnet: 10.96.0.0/12 # 修改一下网段,让两个k8s集群的相对应网段不唯一 kubeamd config view > config.yaml kubectl get nodes # k8s-master # k8s-slave1 kubectl drain k8s-slave1 --ignore-daemonsets kubectl delete nodes k8s-slave1 kubectl drain k8s-master --ignore-daemonsets kubectl delete nodes k8s-master rm -rf /etc/kubernetes/pki/* # 修改配置文件 vim config.yaml podSubnet: 10.250.0.0/16 serviceSubnet: 10.120.0.0/12 ssh root@192.168.26.92 #slave1 kubeadm reset rm -rf /etc/kubernetes/pki/* ssh root@192.168.26.91 #master kubeadm reset kubeadm --config=config.yaml init mkdir -p $HOME/.kube sudo cp -i /etc/kubernetes/admin.conf $HOME/.kube/config sudo chown $(id -u):$(id -g) $HOME/.kube/config # slave1 加入集群: kubeadm join 192.168.26.91:6443 xxxxxxxxxxxxxxxx # 安装网络插件 kubectl apply -f calico.yaml
第一套集群 1 2 3 4 5 6 7 8 9 10 11 12 13 14 15 16 17 18 19 20 21 22 23 24 25 26 27 28 29 30 31 32 33 34 35 36 37 38 39 40 41 42 43 44 45 46 47 48 49 50 51 52 53 54 55 56 57 58 59 60 61 62 63 64 65 66 67 68 69 70 71 72 73 74 75 76 77 78 79 80 81 82 83 84 85 86 87 88 89 90 cd ./kube && cp config config.bak vim config apiVersion: v1 clusters: - cluster: certificate-authority-data: xxxxxxxx 第一套集群copy过来 server: https://192.168.26.81:6443 name: cluster1 - cluster: certificate-authority-data: xxxxxxxx 第二套集群copy过来 server: https://192.168.26.91:6443 name: cluster2 contexts: - context: cluster: cluster1 namespace: ns1 user: admin1 name: cluster1 - context: cluster: cluster2 namespace: default user: admin2 name: cluster2 current-context: cluster1 kind: Config preferences: {}users: - name: admin1 user: client-certificate-data: client-key-data: - name: admin2 user: client-certificate-data: client-key-data: cat ~/.kube/config.bak kubectl config get-contexts * cluster1 cluster1 admin1 ns1 cluster2 cluster2 admin2 default kubectl config use-context cluster2 kubectl get nodes kubectl config use-context cluster1 export CTX_CLUSTER1=cluster1 export CTX_CLUSTER2=cluster2 cd istio-1.10.3 mkdir -p certs pushd certs make -f ../tools/certs/Makefile.selfsigned.mk root-ca root-cert.pem:生成的根证书 root-key.pem:生成的根密钥 root-ca.conf:生成根证书的 openssl 配置 root-cert.csr:为根证书生成的 CSR make -f ../tools/certs/Makefile.selfsigned.mk cluster1-cacerts make -f ../tools/certs/Makefile.selfsigned.mk cluster2-cacerts kubectl create namespace istio-system kubectl create secret generic cacerts -n istio-system \ --from-file=cluster1/ca-cert.pem \ --from-file=cluster1/ca-key.pem \ --from-file=cluster1/root-cert.pem \ --from-file=cluster1/cert-chain.pem kubectl create --context=${CTX_CLUSTER2=cluster2} namespace istio-system kubectl create --context=${CTX_CLUSTER2=cluster2} secret generic cacerts -n istio-system \ --from-file=cluster2/ca-cert.pem \ --from-file=cluster2/ca-key.pem \ --from-file=cluster2/root-cert.pem \ --from-file=cluster2/cert-chain.pem
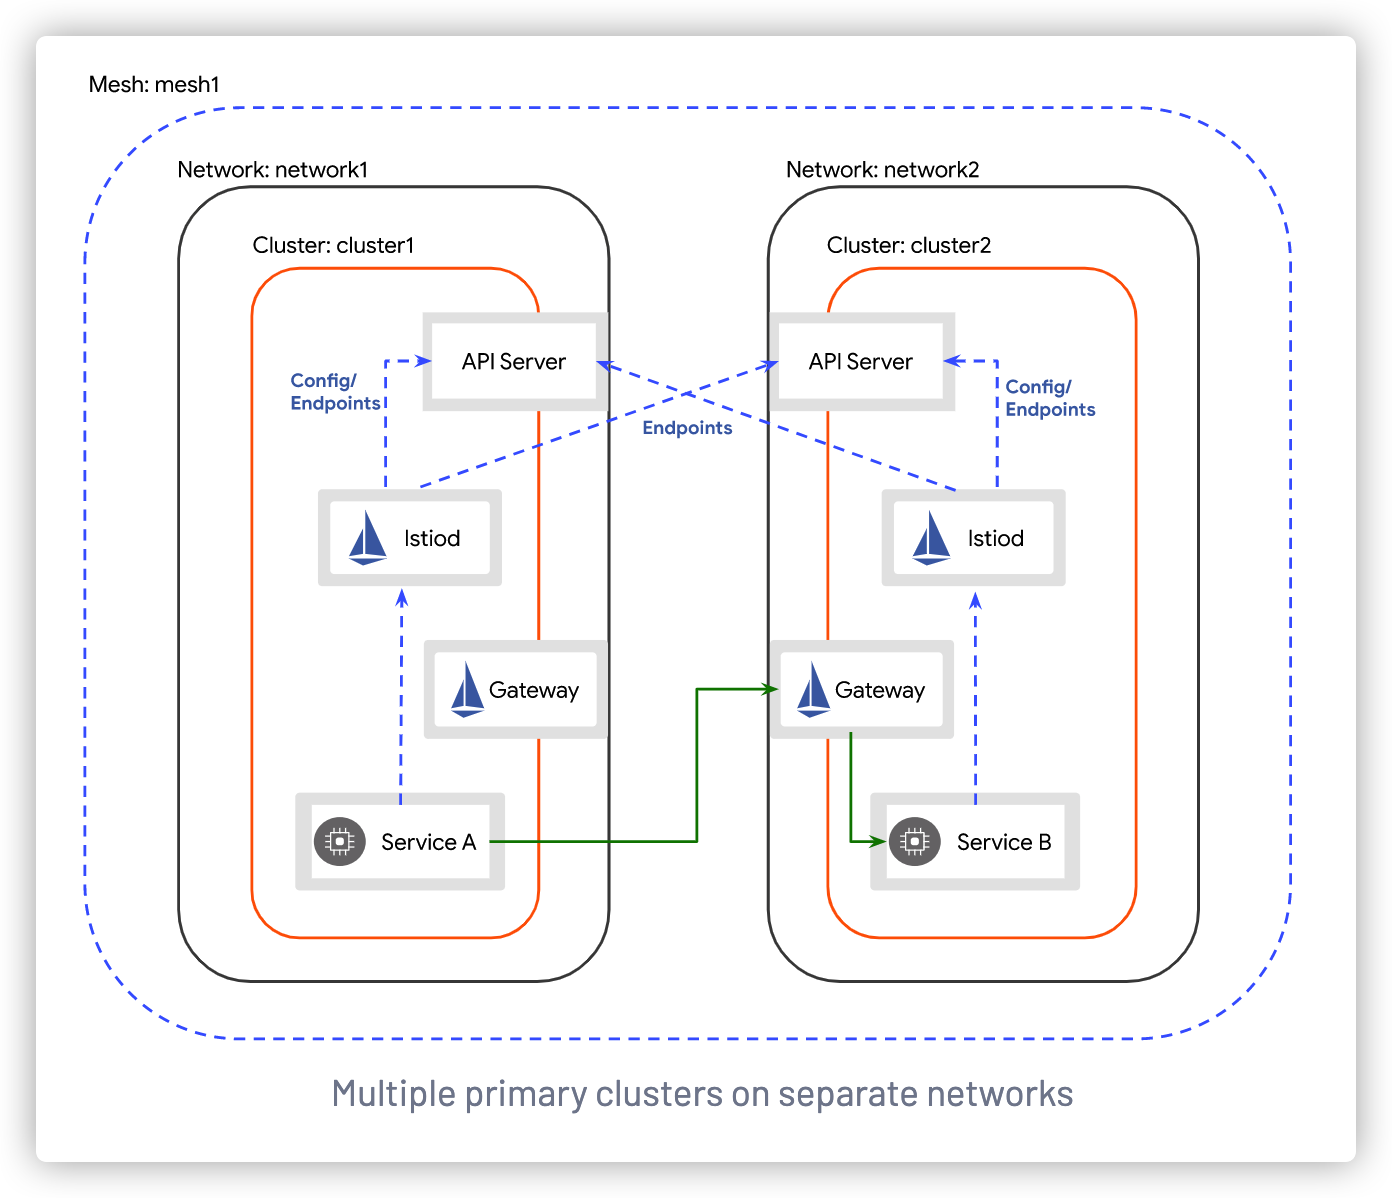
跨网络多主架构安装 https://istio.io/v1.10/zh/docs/setup/install/multicluster/multi-primary_multi-network/
1 2 3 4 5 6 7 8 9 10 11 12 13 14 15 16 17 18 19 20 21 22 23 24 25 26 27 28 29 30 31 32 33 34 35 36 37 38 39 40 41 42 43 44 45 46 47 48 49 50 51 52 53 54 55 56 57 58 59 60 61 62 63 64 65 66 67 68 69 70 71 72 73 74 75 76 77 kubectl --context="${CTX_CLUSTER1}" get namespace istio-system && \ kubectl --context="${CTX_CLUSTER1}" label namespace istio-system topology.istio.io/network=network1 kubectl --context="${CTX_CLUSTER2}" get namespace istio-system && \ kubectl --context="${CTX_CLUSTER2}" label namespace istio-system topology.istio.io/network=network2 cat <<EOF > cluster1.yaml apiVersion: install.istio.io/v1alpha1 kind: IstioOperator spec: values: global: meshID: mesh1 multiCluster: clusterName: cluster1 network: network1 EOF vim cluster1.yaml apiVersion: install.istio.io/v1alpha1 kind: IstioOperator spec: profile: demo values: global: meshID: mesh1 multiCluster: clusterName: cluster1 network: network1 istioctl install --context="${CTX_CLUSTER1}" -f cluster1.yaml cat <<EOF > cluster2.yaml apiVersion: install.istio.io/v1alpha1 kind: IstioOperator spec: values: global: meshID: mesh1 multiCluster: clusterName: cluster2 network: network2 EOF vim cluster2.yaml apiVersion: install.istio.io/v1alpha1 kind: IstioOperator spec: profile: demo values: global: meshID: mesh1 multiCluster: clusterName: cluster2 network: network2 istioctl install --context="${CTX_CLUSTER2}" -f cluster2.yaml istioctl x create-remote-secret \ --context="${CTX_CLUSTER1}" \ --name=cluster1 | \ kubectl apply -f - --context="${CTX_CLUSTER2}" kubectl get secrets -n istio-system istioctl x create-remote-secret \ --context="${CTX_CLUSTER2}" \ --name=cluster2 | \ kubectl apply -f - --context="${CTX_CLUSTER1}"
验证安装结果 https://istio.io/v1.10/zh/docs/setup/install/multicluster/verify/
1
2
3
4
5
6
7
8
9
10
11
12
13
14
15
16
17
18
# 首先,在每个集群中创建命名空间 sample: kubectl create --context="${CTX_CLUSTER1}" namespace sample kubectl create --context="${CTX_CLUSTER2}" namespace sample # 为命名空间 sample 开启 sidecar 自动注入: kubectl label --context="${CTX_CLUSTER1}" namespace sample \ istio-injection=enabled kubectl label --context="${CTX_CLUSTER2}" namespace sample \ istio-injection=enabled # 在每个集群中创建 HelloWorld 服务: kubectl apply --context="${CTX_CLUSTER1}" \ -f samples/helloworld/helloworld.yaml \ -l service=helloworld -n sample kubectl apply --context="${CTX_CLUSTER2}" \ -f samples/helloworld/helloworld.yaml \ -l service=helloworld -n sample
部署 V1 版的 HelloWorld 1 2 3 4 5 6 7 8 9 10 11 # 把应用 helloworld-v1 部署到 cluster1: kubectl apply --context="${CTX_CLUSTER1}" \ -f samples/helloworld/helloworld.yaml \ -l version=v1 -n sample # 确认 helloworld-v1 pod 的状态: kubectl get pod --context="${CTX_CLUSTER1}" -n sample -l app=helloworld NAME READY STATUS RESTARTS AGE helloworld-v1-86f77cd7bd-cpxhv 2/2 Running 0 40s # 等待 helloworld-v1 的状态最终变为 Running 状态:
等待 helloworld-v1 的状态最终变为 Running 状态: 1 2 3 4 5 6 7 8 9 10 11 # 把应用 helloworld-v2 部署到 cluster2: kubectl apply --context="${CTX_CLUSTER2}" \ -f samples/helloworld/helloworld.yaml \ -l version=v2 -n sample # 确认 helloworld-v2 pod 的状态: kubectl get pod --context="${CTX_CLUSTER2}" -n sample -l app=helloworld NAME READY STATUS RESTARTS AGE helloworld-v2-758dd55874-6x4t8 2/2 Running 0 40s # 等待 helloworld-v2 的状态最终变为 Running 状态:
部署 Sleep 1 2 3 4 5 6 7 8 9 10 11 12 13 14 15 16 17 18 # 把应用 Sleep 部署到每个集群: kubectl apply --context="${CTX_CLUSTER1}" \ -f samples/sleep/sleep.yaml -n sample kubectl apply --context="${CTX_CLUSTER2}" \ -f samples/sleep/sleep.yaml -n sample # 确认 cluster1 上 Sleep 的状态: kubectl get pod --context="${CTX_CLUSTER1}" -n sample -l app=sleep NAME READY STATUS RESTARTS AGE sleep-754684654f-n6bzf 2/2 Running 0 5s # 等待 Sleep 的状态最终变为 Running 状态: # 确认 cluster2 上 Sleep 的状态: kubectl get pod --context="${CTX_CLUSTER2}" -n sample -l app=sleep NAME READY STATUS RESTARTS AGE sleep-754684654f-dzl9j 2/2 Running 0 5s # 等待 Sleep 的状态最终变为 Running 状态:
验证跨集群流量
要验证跨集群负载均衡是否按预期工作,需要用 Sleep pod 重复调用服务 HelloWorld。 为了确认负载均衡按预期工作,需要从所有集群调用服务 HelloWorld。
1 2 3 4 5 6 7 8 9 10 11 12 13 14 15 16 17 18 19 20 21 22 23 # 从 cluster1 中的 Sleep pod 发送请求给服务 HelloWorld: kubectl exec --context="${CTX_CLUSTER1}" -n sample -c sleep \ "$(kubectl get pod --context="${CTX_CLUSTER1}" -n sample -l \ app=sleep -o jsonpath='{.items[0].metadata.name}')" \ -- curl helloworld.sample:5000/hello # 重复几次这个请求,验证 HelloWorld 的版本在 v1 和 v2 之间切换: Hello version: v2, instance: helloworld-v2-758dd55874-6x4t8 Hello version: v1, instance: helloworld-v1-86f77cd7bd-cpxhv ... # 现在,用 cluster2 中的 Sleep pod 重复此过程: kubectl exec --context="${CTX_CLUSTER2}" -n sample -c sleep \ "$(kubectl get pod --context="${CTX_CLUSTER2}" -n sample -l \ app=sleep -o jsonpath='{.items[0].metadata.name}')" \ -- curl helloworld.sample:5000/hello # 重复几次这个请求,验证 HelloWorld 的版本在 v1 和 v2 之间切换: Hello version: v2, instance: helloworld-v2-758dd55874-6x4t8 Hello version: v1, instance: helloworld-v1-86f77cd7bd-cpxhv ... # 恭喜! 你已成功的在多集群环境中安装、并验证了 Istio!。。。