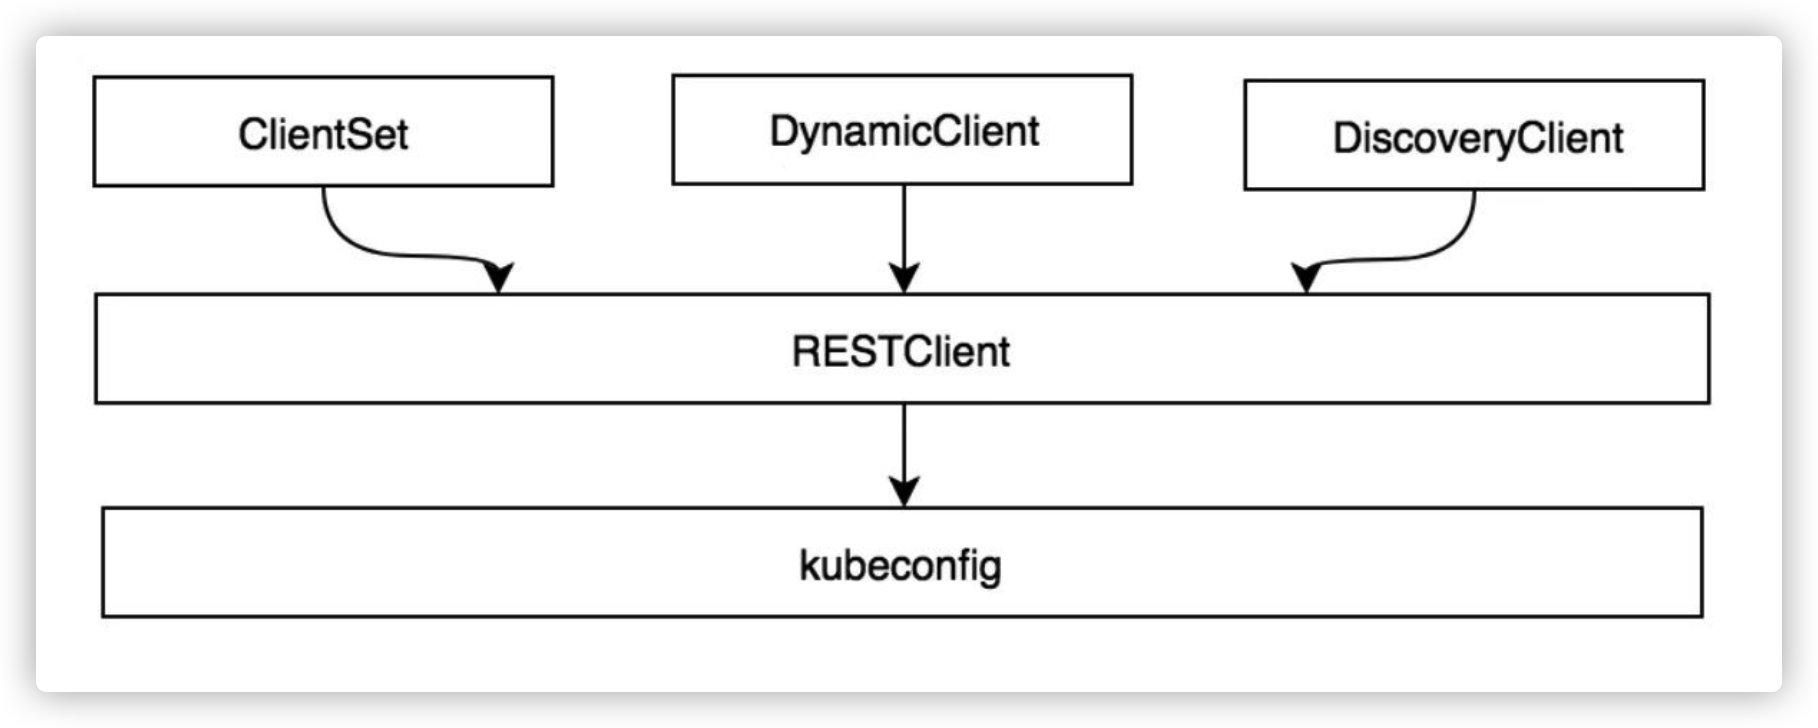
Client-go 四种客户端交互对象
RESTClient 是最基础的客户端。 RESTClient 对 HTTP Request 进⾏了封装,实现了 RESTful ⻛格的 API 。 ClientSet、DynamicClient 及 DiscoveryClient 客户端都是基于 RESTClient 实现的。
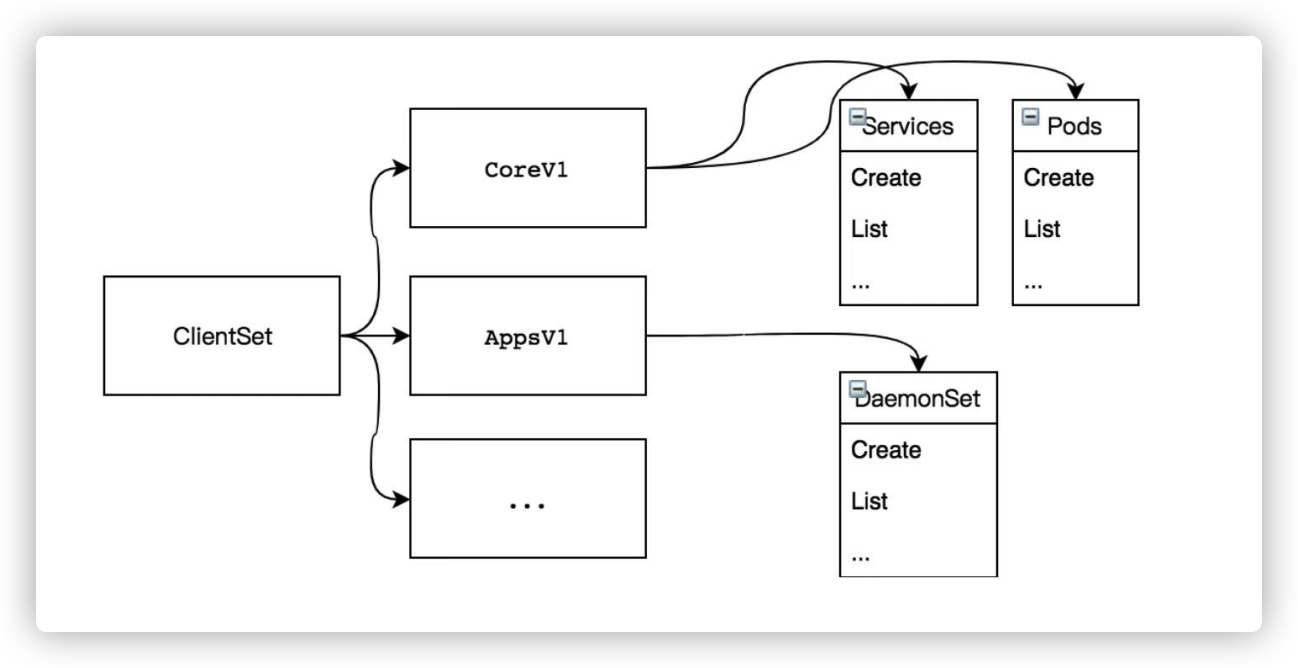
ClientSet 在 RESTClient 的基础上封装了对 Resource 和 Version 的管理⽅法。每⼀个 Resource 可以理解为⼀个客户端,⽽ ClientSet 则是多个客户端的集合,每⼀个 Resource 和 Version 都以函数的⽅式暴露给开发者。 ClientSet 只能够处理 Kubernetes 内 置资源,它是通过 client-gen 代码⽣成器⾃动⽣成的。
DynamicClient 与 ClientSet 最⼤的不同之处是, ClientSet 仅能访问 Kubernetes ⾃带的资源(即 Client 集合内的资源),不能直接访问 CRD ⾃定义资源。 DynamicClient 能够处理 Kubernetes 中的所有资源对象,包括 Kubernetes 内置资源与 CRD ⾃定义资源。
DiscoveryClient 发现客户端,⽤于发现 kube-apiserver 所⽀持的资源组、资源版本、资源信息(即 Group、Versions、Resources )。
以上 4 种客户端: RESTClient 、 ClientSet 、 DynamicClient 、 DiscoveryClient 都可以通过 kubeconfig 配置信息连接到指定的 Kubernetes API Server。
RestClient 客户端对象
RESTClient 是最基础的客户端。其他的 ClientSet 、 DynamicClient 及 DiscoveryClient 都是基于 RESTClient 实现的。 RESTClient 对 HTTP Request 进⾏了封装,实现了 RESTful ⻛格的 API 。它具有很⾼的灵活性,数据不依赖于⽅法和资源,因此 RESTClient 能够处理多种类型的调⽤,返回不同的数据格式。
类似于 kubectl 命令,通过 RESTClient 列出 kube-system 运⾏的 Pod 资源对象, RESTClient Example 代码⽰例 :
1
2
3
4
5
6
7
8
9
10
11
12
13
14
15
16
17
18
19
20
21
22
23
24
25
26
27
28
29
30
31
32
33
34
35
36
37
38
39
40
41
42
43
44
45
46
47
48
49
50
51
52
53
54
55
56
57
58
59
60
61
62
63
64
65
66
67
68
69
70
71
72
73
74
75
76
77
78
79
80
81
82
83
84
85
86
package mainimport ( "context" "flag" "fmt" "k8s.io/client-go/kubernetes/scheme" "k8s.io/client-go/rest" "k8s.io/client-go/tools/clientcmd" "k8s.io/client-go/util/homedir" corev1 "k8s.io/api/core/v1" metav1 "k8s.io/apimachinery/pkg/apis/meta/v1" "path/filepath" ) func main () var kubeconfig *string if home:=homedir.HomeDir(); home != "" { kubeconfig = flag.String("kubeconfig" , filepath.Join(home, ".kube" , "config" ), "(optional) absolute path to the kubeconfig file" ) } else { kubeconfig = flag.String("kubeconfig" , "" , "absolute path to the kubeconfig file" ) } flag.Parse() config, err := clientcmd.BuildConfigFromFlags("" , *kubeconfig) if err != nil { panic (err.Error()) } config.APIPath = "api" config.GroupVersion = &corev1.SchemeGroupVersion config.NegotiatedSerializer = scheme.Codecs restClient, err := rest.RESTClientFor(config) if err!=nil { panic (err.Error()) } result := &corev1.PodList{} namespace := "kube-system" err = restClient.Get(). Namespace(namespace). Resource("pods" ). VersionedParams(&metav1.ListOptions{Limit:100 }, scheme.ParameterCodec). Do(context.TODO()). Into(result) if err != nil { panic (err.Error()) } fmt.Printf("Namespace\t Status\t\t Name\n" ) for _, d := range result.Items { fmt.Printf("%v\t %v\t %v\n" , d.Namespace, d.Status.Phase, d.Name) } }
运⾏以上代码,列出 kube-system 命名空间下的所有 Pod 资源对象的相关信息。⾸先加载 kubeconfig 配置信息,并设置 config.APIPath 请求的 HTTP 路径。然后设置 config.GroupVersion 请求的资源组/资源版本。最后设置 config.NegotiatedSerializer 数据的编解码器。
rest.RESTClientFor 函数通过 kubeconfig 配置信息实例化 RESTClient 对象, RESTClient 对象构建 HTTP 请求参数,例如 Get 函数设置请求⽅法为 get 操作,它还⽀持 Post、Put、Delete、Patch 等请求⽅法。 Namespace 函数设置请求的命名空间。 Resource 函数设置请求的资源名称。 VersionedParams 函数将⼀些查询选项(如 limit、TimeoutSeconds 等)添加到请求参数中。通过 Do 函数执⾏该请求,并将 kube-apiserver 返回的结果( Result 对象)解析到 corev1.PodList 对象中。最终格式化输出结果。
RESTClient 发送请求的过程对 Go 语⾔标准库 net/http 进⾏了封装,由 Do→request 函数实现,代码⽰例如下:
代码路径: vendor/k8s.io/client-go/rest/request.go
1
2
3
4
5
6
7
8
9
func (r *Request) Do (ctx context.Context) Result var result Result err := r.request(ctx, func (req *http.Request, resp *http.Response) result = r.transformResponse(resp, req) }) if err != nil { return Result{err: err} }return result }
请求发送之前需要根据请求参数⽣成请求的 RESTful URL ,由 r.URL.String 函数完成。例如,在 RESTClient Example 代码⽰例中,根据请求参数⽣成请求的 RESTful URL 为 http://127.0.0.1:8080/api/v1/namespaces/kube-system/pods?limit=500 ,其中 api 参数为 v1 ,namespace 参数为 system ,请求的资源为 pods , limit 参数表⽰最多检索出 500 条信息。
最后通过 Go 语⾔标准库 net/http 向 RESTful URL (即 kube-apiserver )发送请求,请求得到的结果存放在 http.Response 的 Body 对象中, fn 函数(即 transformResponse )将结果转换为资源对象。当函数退出时,会通过 resp.Body.Close 命令进⾏关闭,防⽌内存溢出。
ClientSet 客户端对象
RESTClient 是⼀种最基础的客户端,使⽤时需要指定 Resource 和 Version 等信息,编写代码时需要提前知道 Resource 所在的 Group 和对应的 Version 信息。相⽐ RESTClient,ClientSet 使⽤起来更加便捷,⼀般情况下,开发者对 Kubernetes 进⾏⼆次开发时通常使⽤ ClientSet 。
ClientSet 在 RESTClient 的基础上封装了对 Resource 和 Version 的管理⽅法。每⼀个 Resource 可以理解为⼀个客户端,⽽ ClientSet 则是多个客户端的集合,每⼀个 Resource 和 Version 都以函数的⽅式暴露给开发者,例如, ClientSet 提供的 RbacV1 、 CoreV1 、 NetworkingV1 等接⼝函数
注意: ClientSet 仅能访问 Kubernetes ⾃⾝内置的资源(即客户端集合内的资源),不能直接访问 CRD ⾃定义资源。 如果需要 ClientSet 访问 CRD ⾃定义资源,可以通过 client-gen 代码⽣成器重新⽣成 ClientSet ,在 ClientSet 集合中⾃动⽣成与 CRD 操作相关的接⼝
通过 ClientSet 创建⼀个新的命名空间 xiaoyuan 以及⼀个新的 deployment , ClientSet Example 代码,类似于 kubectl 命令
⽰例如下:
1
2
3
4
5
6
7
8
9
10
11
12
13
14
15
16
17
18
19
20
21
22
23
24
25
26
27
28
29
30
31
32
33
34
35
36
37
38
39
40
41
42
43
44
45
46
47
48
49
50
51
52
53
54
55
56
57
58
59
60
61
62
63
64
65
66
67
68
69
70
71
72
73
74
75
76
77
78
79
80
81
82
83
84
85
86
87
88
89
90
91
92
93
94
95
96
97
98
99
100
101
102
103
104
105
106
107
108
109
110
111
112
113
114
115
116
117
118
119
120
121
122
123
124
125
package mainimport ( "context" "flag" "fmt" "path/filepath" appsv1 "k8s.io/api/apps/v1" apiv1 "k8s.io/api/core/v1" metav1 "k8s.io/apimachinery/pkg/apis/meta/v1" "k8s.io/client-go/kubernetes" "k8s.io/client-go/tools/clientcmd" "k8s.io/client-go/util/homedir" ) const ( NAMESPACE = "xiaoyuan" DEPLOYMENTNAME = "kubecto-deploy" IMAGE = "nginx:1.13" PORT = 80 REPLICAS = 2 ) func main () var kubeconfig *string if home := homedir.HomeDir(); home != "" { kubeconfig = flag.String("kubeconfig" , filepath.Join(home, ".kube" , "config" ), "(optional) kubeconfig文件的绝对路径" ) } else { kubeconfig = flag.String("kubeconfig" , "" , "kubeconfig文件的绝对路径" ) } flag.Parse() config, err := clientcmd.BuildConfigFromFlags("" , *kubeconfig) if err != nil { panic (err) } clientset, err := kubernetes.NewForConfig(config) if err != nil { panic (err) } createNamespace(clientset) createDeployment(clientset) } func createNamespace (clientset *kubernetes.Clientset) namespaceClient := clientset.CoreV1().Namespaces() namespace := &apiv1.Namespace{ ObjectMeta: metav1.ObjectMeta{ Name: NAMESPACE, }, } result, err := namespaceClient.Create(context.TODO(), namespace, metav1.CreateOptions{}) if err!=nil { panic (err.Error()) } fmt.Printf("Create namespace %s \n" , result.GetName()) } func createDeployment (clientset *kubernetes.Clientset) deploymentsClient := clientset.AppsV1().Deployments(NAMESPACE) deployment := &appsv1.Deployment{ ObjectMeta: metav1.ObjectMeta{ Name: DEPLOYMENTNAME, }, Spec: appsv1.DeploymentSpec{ Replicas: int32Ptr(REPLICAS), Selector: &metav1.LabelSelector{ MatchLabels: map [string ]string { "app" : "kubecto" , }, }, Template: apiv1.PodTemplateSpec{ ObjectMeta: metav1.ObjectMeta{ Labels: map [string ]string { "app" : "kubecto" , }, }, Spec: apiv1.PodSpec{ Containers: []apiv1.Container{ { Name: "web" , Image: IMAGE, Ports: []apiv1.ContainerPort{ { Name: "http" , Protocol: apiv1.ProtocolTCP, ContainerPort: PORT, }, }, }, }, }, }, }, } fmt.Println("Creating deployment..." ) result, err := deploymentsClient.Create(context.TODO(), deployment, metav1.CreateOptions{}) if err != nil { panic (err) } fmt.Printf("Created deployment %q.\n" , result.GetObjectMeta().GetName()) } func int32Ptr (i int32 ) *int32 return &i }
运⾏以上代码,会创建 2 个 nginx 的 deployment 。⾸先加载 kubeconfig 配置信息, kubernetes.NewForConfig 通过 kubeconfig 配置信息实例化 clientset 对象,该对象⽤于管理所有 Resource 的客户端。
DynamicClient 客户端对象
DynamicClient 是⼀种动态客户端,它可以对任意 Kubernetes 资源进⾏ RESTful 操作,包括 CRD ⾃定义资源。 DynamicClient 与 ClientSet 操作类似,同样封装了 RESTClient ,同样提供了 Create、Update、Delete、Get、List、Watch、Patch 等⽅法
DynamicClient 与 ClientSet 最⼤的不同之处是, ClientSet 仅能访问 Kubernetes ⾃带的资源(即客户端集合内的资源),不能直接访问 CRD ⾃定义资源。 ClientSet 需要预先实现每种 Resource 和 Version 的操作,其内部的数据都是结构化数据(即已知数据结构)。⽽ DynamicClient 内部实现了 Unstructured ,⽤于处理⾮结构化数据结构(即⽆法提前预知数据结构),这也是 DynamicClient 能够处理 CRD ⾃定义资源的关键
注意: DynamicClient 不是类型安全的,因此在访问 CRD ⾃定义资源时需要特别注意。例如,在操作指针不当的情况下可能会导致程序崩溃
DynamicClient 的处理过程将 Resource (例如 PodList )转换成 Unstructured 结构类型, Kubernetes 的所有 Resource 都可以转换为该结构类型。处理完成后,再将 Unstructured 转换成 PodList 。整个过程类似于 Go 语⾔的 interface{} 断⾔转换过程。另外, Unstructured 结构类型是通过 map[string]interface{} 转换的。
通过 DynamicClient 创建 deployment ,并使⽤ list 列出当前 pod 的名称和数量,类似 kubectl 命令 ,DynamicClient Example 代码⽰例:
1
2
3
4
5
6
7
8
9
10
11
12
13
14
15
16
17
18
19
20
21
22
23
24
25
26
27
28
29
30
31
32
33
34
35
36
37
38
39
40
41
42
43
44
45
46
47
48
49
50
51
52
53
54
55
56
57
58
59
60
61
62
63
64
65
66
67
68
69
70
71
72
73
74
75
76
77
78
79
80
81
82
83
84
85
86
87
88
89
90
91
92
93
94
95
96
97
98
99
100
101
102
103
104
105
106
107
108
109
110
111
112
113
114
115
116
117
118
119
120
121
122
123
124
125
126
127
128
129
package mainimport ( "bufio" "context" "flag" "fmt" "os" "path/filepath" apiv1 "k8s.io/api/core/v1" metav1 "k8s.io/apimachinery/pkg/apis/meta/v1" "k8s.io/apimachinery/pkg/apis/meta/v1/unstructured" "k8s.io/apimachinery/pkg/runtime/schema" "k8s.io/client-go/dynamic" "k8s.io/client-go/tools/clientcmd" "k8s.io/client-go/util/homedir" ) func main () var kubeconfig *string if home := homedir.HomeDir(); home != "" { kubeconfig = flag.String("kubeconfig" , filepath.Join(home, ".kube" , "config" ), "(optional) absolute path to the kubeconfig file" ) } else { kubeconfig = flag.String("kubeconfig" , "" , "absolute path to the kubeconfig file" ) } flag.Parse() namespace := "default" replicas := 2 deployname := "ku" image := "nginx:1.17" config, err := clientcmd.BuildConfigFromFlags("" , *kubeconfig) if err != nil { panic (err) } client, err := dynamic.NewForConfig(config) if err != nil { panic (err) } deploymentRes := schema.GroupVersionResource{Group: "apps" , Version: "v1" , Resource: "deployments" } deployment := &unstructured.Unstructured{ Object: map [string ]interface {}{ "apiVersion" : "apps/v1" , "kind" : "Deployment" , "metadata" : map [string ]interface {}{ "name" : deployname, }, "spec" : map [string ]interface {}{ "replicas" : replicas, "selector" : map [string ]interface {}{ "matchLabels" : map [string ]interface {}{ "app" : "demo" , }, }, "template" : map [string ]interface {}{ "metadata" : map [string ]interface {}{ "labels" : map [string ]interface {}{ "app" : "demo" , }, }, "spec" : map [string ]interface {}{ "containers" : []map [string ]interface {}{ { "name" : "web" , "image" : image, "ports" : []map [string ]interface {}{ { "name" : "http" , "protocol" : "TCP" , "containerPort" : 80 , }, }, }, }, }, }, }, }, } fmt.Println("创建 deployment..." ) result, err := client.Resource(deploymentRes).Namespace(namespace).Create(context.TODO(), deployment, metav1.CreateOptions{}) if err != nil { panic (err) } fmt.Printf("创建 deployment %q.\n" , result.GetName()) prompt() fmt.Printf("在命名空间中列出deployment %q:\n" , apiv1.NamespaceDefault) list, err := client.Resource(deploymentRes).Namespace(namespace).List(context.TODO(), metav1.ListOptions{}) if err != nil { panic (err) } for _, d := range list.Items { replicas, found, err := unstructured.NestedInt64(d.Object, "spec" , "replicas" ) if err != nil || !found { fmt.Printf("Replicas not found for deployment %s: error=%s" , d.GetName(), err) continue } fmt.Printf(" * %s (%d replicas)\n" , d.GetName(), replicas) } } func prompt () fmt.Printf("--------------> 按回车键继续 <--------------." ) scanner := bufio.NewScanner(os.Stdin) for scanner.Scan() { break } if err := scanner.Err(); err != nil { panic (err) } fmt.Println() }
⾸先加载 kubeconfig 配置信息, dynamic.NewForConfig 通过 kubeconfig 配置信息实例化 dynamicClient 对象,该对象⽤于管理 Kubernetes 的所有 Resource 的客户端,例如对 Resource 执⾏ Create、Update、Delete、Get、List、Watch、Patch 等操作
DiscoveryClient 客户端对象
DiscoveryClient 是发现客户端,它主要⽤于发现 Kubernetes API Server 所⽀持的资源组、资源版本、资源信息。 Kubernetes API Server ⽀持很多资源组、资源版本、资源信息,开发者在开发过程中很难记住所有信息,此时可以通过 DiscoveryClient 查看所⽀持的资源组、资源版本、资源信息。
kubectl 的 api-versions 和 api-resources 命令输出也是通过 DiscoveryClient 实现的。另外, DiscoveryClient 同样在 RESTClient 的基础上进⾏了封装
DiscoveryClient 除了可以发现 Kubernetes API Server 所⽀持的资源组、资源版本、资源信息,还可以将这些信息存储到本地,⽤于本地缓存( Cache ),以减轻对 Kubernetes API Server 访问的压⼒。在运⾏ Kubernetes 组件的机器上,缓存信息默认存储于 〜/.kube/cache 和 〜/.kube/http-cache 下
类似于 kubectl 命令,通过 DiscoveryClient 列出 Kubernetes API Server 所⽀持的资源组、资源版本、资源信息, DiscoveryClient Example 代码⽰例如下:
1
2
3
4
5
6
7
8
9
10
11
12
13
14
15
16
17
18
19
20
21
22
23
24
25
26
27
28
29
30
31
32
33
34
35
36
37
38
39
40
41
42
43
44
45
46
47
48
49
50
51
52
53
54
55
56
57
58
59
60
61
62
63
64
65
66
67
68
69
70
71
72
73
74
75
package mainimport ( "flag" "fmt" "k8s.io/apimachinery/pkg/runtime/schema" "k8s.io/client-go/discovery" "k8s.io/client-go/tools/clientcmd" "k8s.io/client-go/util/homedir" "path/filepath" ) func main () var kubeconfig *string if home:=homedir.HomeDir(); home != "" { kubeconfig = flag.String("kubeconfig" , filepath.Join(home, ".kube" , "config" ), "(optional) absolute path to the kubeconfig file" ) } else { kubeconfig = flag.String("kubeconfig" , "" , "absolute path to the kubeconfig file" ) } flag.Parse() config, err := clientcmd.BuildConfigFromFlags("" , *kubeconfig) if err != nil { panic (err.Error()) } discoveryClient, err := discovery.NewDiscoveryClientForConfig(config) if err != nil { panic (err.Error()) } APIGroup, APIResourceListSlice, err := discoveryClient.ServerGroupsAndResources() if err != nil { panic (err.Error()) } fmt.Printf("APIGroup :\n\n %v\n\n\n\n" ,APIGroup) for _, singleAPIResourceList := range APIResourceListSlice { groupVerionStr := singleAPIResourceList.GroupVersion gv, err := schema.ParseGroupVersion(groupVerionStr) if err != nil { panic (err.Error()) } fmt.Println("*****************************************************************" ) fmt.Printf("GV string [%v]\nGV struct [%#v]\nresources :\n\n" , groupVerionStr, gv) for _, singleAPIResource := range singleAPIResourceList.APIResources { fmt.Printf("%v\n" , singleAPIResource.Name) } } }
运⾏以上代码,列出 Kubernetes API Server 所⽀持的资源组、资源版本、资源信息。⾸先加载 kubeconfig 配置信息, discovery.NewDiscoveryClientForConfig 通过 kubeconfig 配置信息实例化 discoveryClient 对象,该对象是⽤于发现 Kubernetes API Server 所⽀持的资源组、资源版本、资源信息的客户端
discoveryClient.ServerGroupsAndResources 函数会返回 Kubernetes API Server 所⽀持的资源组、资源版本、资源信息(即 APIResourceList ),通过遍历 APIResourceList 输出信息。
获取 Kubernetes API Server 所⽀持的资源组、资源版本、资源信息 Kubernetes API Server 暴露出 /api 和 /apis 接⼝。 DiscoveryClient 通过 RESTClient 分别请求 /api 和 /apis 接⼝,从⽽获取 Kubernetes API Server 所⽀持的资源组、资源版本、资源信息。其核⼼实现位于 ServerGroupsAndResources→ServerGroups 中,代码⽰例如下:
代码路径: vendor/k8s.io/client-go/discovery/discovery_client.go
1 2 3 4 5 6 7 8 9 10 11 12 13 14 15 16 17 18 19 20 21 22 23 24 25 26 27 28 29 30 func (d *DiscoveryClient) ServerGroups () (apiGroupList *metav1.APIGroupList, err error) v := &metav1.APIVersions{} err = d.restClient.Get().AbsPath(d.LegacyPrefix).Do(context.TODO()).Into(v) apiGroup := metav1.APIGroup{} if err == nil && len (v.Versions) != 0 { apiGroup = apiVersionsToAPIGroup(v) } if err != nil && !errors.IsNotFound(err) && !errors.IsForbidden(err) { return nil , err } apiGroupList = &metav1.APIGroupList{} err = d.restClient.Get().AbsPath("/apis" ).Do(context.TODO()).Into(apiGroupList) if err != nil && !errors.IsNotFound(err) && !errors.IsForbidden(err) { return nil , err } if err != nil && (errors.IsNotFound(err) || errors.IsForbidden(err)) { apiGroupList = &metav1.APIGroupList{} } if len (v.Versions) != 0 { apiGroupList.Groups = append ([]metav1.APIGroup{apiGroup}, apiGroupList.Groups...) } return apiGroupList, nil }
⾸先, DiscoveryClient 通过 RESTClient 请求 /api 接⼝,将请求结果存放于 metav1.APIVersions 结构体中。然后,再次通过 RESTClient 请求 /apis 接⼝,将请求结果存放于 metav1.APIGroupList 结构体中。最后,将 /api 接⼝中检索到的资源组信息合并到 apiGroupList 列表中并返回
本地缓存的 DiscoveryClient
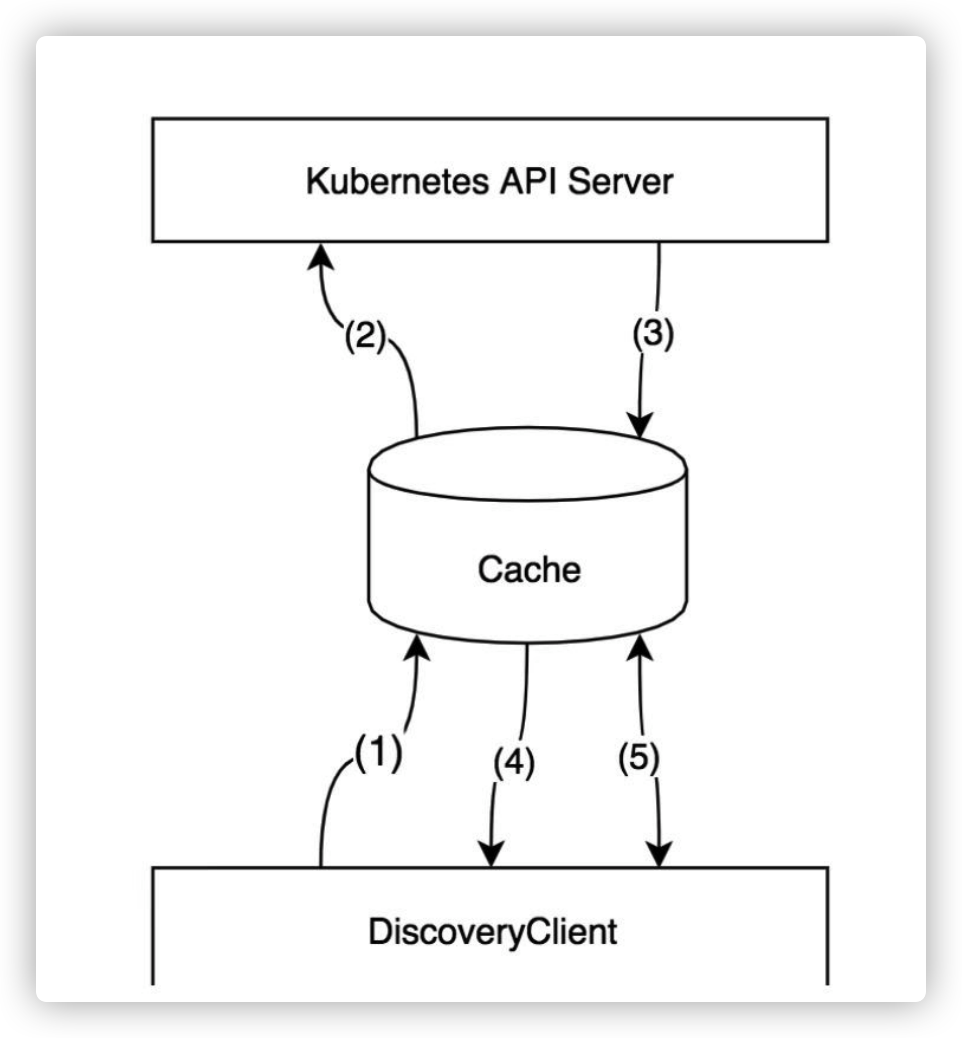
DiscoveryClient 可以将资源相关信息存储于本地,默认存储位置为 〜/.kube/cache 和 〜/.kube/http-cache 。缓存可以减轻 client-go 对 Kubernetes API Server 的访问压⼒。默认每 10 分钟与 Kubernetes API Server 同步⼀次,同步周期较⻓,因为资源组、源版本、资源信息⼀般很少变动。本地缓存的 DiscoveryClient
DiscoveryClient 第⼀次获取资源组、资源版本、资源信息时,⾸先会查询本地缓存,如果数据不存在(没有命中)则请求 Kubernetes API Server 接⼝(回源), Cache 将 Kubernetes API Server 响应的数据存储在本地⼀份并返回给 DiscoveryClient 。当下⼀次 DiscoveryClient 再次获取资源信息时,会将数据直接从本地缓存返回(命中)给 DiscoveryClient 。本地缓存的默认存储周期为 10 分钟。代码⽰例如下
代码路径: vendor/k8s.io/client-go/discovery/cached/disk/cached_discovery.go


